Friday, April 29

Cadbury Egg Brownies

This idea came from my bestest friend Laura. This is an excellent idea to use up that extra candy. Assuming that you have extra candy...

I took a recipe from Food Network and modified it to her specifications.

Deep Dish Brownies

3 tablespoons unsalted butter
2 tablespoons canola or other neutral tasting oil
4 ounces semisweet chocolate, coarsely chopped
3 Cadbury cream eggs, chopped
3/4 cup packed dark brown sugar
1/4 cup white sugar
2 teaspoons pure vanilla extract
1/2 teaspoon fine salt
2 large eggs, cold
1 tablespoon cold brewed coffee
1/4 cup cocoa powder
3/4 cup all-purpose flour
1/4 teaspoon baking soda


Heat oven to 325 degrees F. Use an 9x9 silicon baking pan or line a similar sized metal or glass baking dish with foil so it hangs over the edges by about 1 inch. Spray the prepared pan completely.
Put the butter, oil and chocolate in a microwave-safe bowl, and heat at 75 percent power for 2 minutes. Stir, and microwave again until completely melted, about 2 minutes more. 
Stir the brown and white sugars, vanilla and salt into the chocolate mixture with a wooden spoon. Add the eggs and coffee and beat vigorously until fully incorporated and the batter is thick and glossy. Add the cocoa, flour and baking soda and stir just until it disappears.
Pour the batter into the pan and bake until the top is crispy and a toothpick inserted into the middle comes out with a few crumbs, about 30-40 minutes.
Cool the brownies in the pan on the counter. Lift brownies out of the pan by the foil, if needed. Peel off the foil and cut into 2-inch squares.


 The brownie recipe is a healthy version of brownies. As healthy as brownies can be I suppose. They came out not too sweet, fudgey and fluffy.

I would make these again, with or without the Cadbury eggs. 
I think this is a clever idea to use up some candy. Or a fun excuse to make brownies.

Enjoy! And thanks Laura to for the tasty idea.

Thursday, April 28

Sugar Cookies

So to be honest I'm not a fan of sugar cookies. Especially those hard, crumbly ones covered in super sweet icing. It's not my thing. So I found a recipe that hit the spot. Alton Brown, Food Network's recipe master put together this gem.

Sugar Cookies

3 cups all-purpose flour
3/4 teaspoon baking powder
1/4 teaspoon salt
1 cup unsalted butter, softened
1 cup sugar
1 egg, beaten
1 tablespoon milk
(1 teaspoon vanilla extract, I added this for extra flavor)
Powdered sugar, for rolling out dough

Sift together flour, baking powder, and salt. Set aside. Place butter and sugar in large bowl of electric stand mixer and beat until light in color. (I don't have a stand mixer, I used a hand mixer) Add egg and milk and beat to combine. Put mixer on low speed, gradually add flour, and beat until mixture pulls away from the side of the bowl. Divide the dough in half, wrap in waxed paper, and refrigerate for 2 hours.
Preheat oven to 375 degrees F.
Sprinkle surface where you will roll out dough with powdered sugar. Remove 1 wrapped pack of dough from refrigerator at a time, sprinkle rolling pin with powdered sugar, and roll out dough to 1/4-inch thick. Move the dough around and check underneath frequently to make sure it is not sticking. If dough has warmed during rolling, place cold cookie sheet on top for 10 minutes to chill. Cut into desired shape, place at least 1-inch apart on greased baking sheet, parchment, or silicone baking mat, and bake for 7 to 9 minutes or until cookies are just beginning to turn brown around the edges, rotating cookie sheet halfway through baking time. Let sit on baking sheet for 2 minutes after removal from oven and then move to complete cooling on wire rack. Serve as is or ice as desired. Store in airtight container for up to 1 week.


Okay so this looks complicated. Well as far as I'm concerned it is. But that's because I do NOT bake. I do Not like to bake. Me and baking are not friends. I always forget some important part of the process. And the whole thing fails.

So I was excited that the first time I made these I was able to not fail. I saved the second part of the dough and rolled it out a few days later and baked up some more stars. Of course they aren't perfect because I forgot to grease the cookie sheet and I tried to cram them all on one cookie sheet. But I don't mind if they look crazy, as long as they still taste good.

A word of warning. Try not to take shortcuts. The closer you follow this the better the cookies will be. Alton Brown is very specific and scientific with his recipes. There is an important reason for every step.

They turned out soft and melt in your mouth delicious. I suppose you could put icing on them too, but they were good enough without.

If you like sugar cookies give it a try and this might be one of your new favorites... if you don't like sugar cookies give it a try and it might become one of your favorites.

Wednesday, April 27

Simple Spaghetti

This is an easy, quickie recipe that tastes great! It is a culmination of a Rachel Ray recipe and my own experience. I love pasta!

Simple Spaghetti

olive oil
2 cloves garlic, chopped
1/4 teaspoon red pepper flakes  
1 small can tomato paste
1 can diced tomatoes, drained
1 can tomato sauce
1/8 teaspoon cayenne
1/2 teaspoon dried oregano
1/2 teaspoon onion powder or 1 medium onion, chopped
salt and pepper
3-4 fresh basil leaves, chiffonade


Heat oil in a saucepot. Add garlic and red pepper flakes (add onion at this point if you are using fresh). Once the garlic develops some color, add in the tomato paste. Stir to combine with garlic and oil. Add in drained, diced tomatoes and tomato sauce.  Stir to combine. Add onion powder, oregano, cayenne and salt and pepper to taste. Stir and let simmer for about 10 minutes or longer. Add fresh basil at the end let it simmer only for a few minutes before serving. Serve with any kind of pasta, I like angel hair. Top with Parmesan cheese. Add bread and salad for a full meal!


This is a meal for my own taste. Be sure to try the sauce while adding spices and herbs. Try it with dried basil in the winter. These measurements are fairly approximate, I usually just sprinkle some of everything in.  

You can also add cooked ground beef or sausage. You can use it as a marinara for chicken Parmesan or really anything. It versatile and easy. 

It also makes great leftovers! (Or as my mom's friend named them Plan-overs!)
 

Now go go load up on some carbs!

Tuesday, April 26

Re-Dress

This is a post inspired by my wonderfully talented friend Bish. (Like her as CosplayRandom on Facebook)
She was actually inspired by another blogger that took on the mission of having a New Dress A Day for a year.

Bish happens to have some mad sewing skills and was able to produce a few amazing re-dresses that blew my mind. This is meant to show you that not everything is as it seems. It takes some time and skill but you could take an oldie in your closet, like this first one she did, and turn it into something new.


This dress had a few not so attractive stains on the front. I would probably have trashed it or given it to Goodwill. But not Bish. She snipped a few places. And Ta-da!


An adorable new top, just like that. That is the smile of a girl that knows she just saved a few dollars.

The next one shows us that too big does not mean all wrong.


Yeah most people would have looked at the size sticker and walked off. But Bish was intrigued by the print and neckline of this dress and just knew there was more to it.


Wowie! She sure knows her seams. Take it in, take it up and use the extra fabric to create a cinch belt. Just amazing. A sundress bought for mere change at Goodwill and transformed with a genius hand.

But that's not all.


This last dress took a few extra steps to bring it to life.


The purple dye job was first. Ya gotta go with your favorite color. Then she added some lace trim and shortened the hemline. Cute, summer-y and only a few dollars from a thrift store.

So for those of you out there that have those amazing sewing skills like Bish or Marisa. Don't just play around with patterns and new fabric. Save some time and money and go to your local Goodwill or Thrift store and see if anything inspires you.

Grandma's BBQ Shrimp

This is a family recipe I am sharing with ya'll. So listen up, this is an irresistible shrimp recipe. Don't like shrimp? Gasp. Well this is really tasty so you might even be converted. It's not what you think of when you hear BBQ. It's much better.

Grandma's BBQ Shrimp

2 lbs. shrimp, in shell (medium is the best size, popcorn is too small and jumbo don't have as much flavor)
1/2 cup butter
1 Tablespoon olive oil
1/2 teaspoon salt
1 teaspoon cayenne
1/3 cup Worcestershire
1/2 teaspoon black pepper
1/2 teaspoon thyme, dried
1/2 rosemary, dried
1/2 teaspoon oregano, dried
2 cloves garlic, chopped
2 lemons juiced

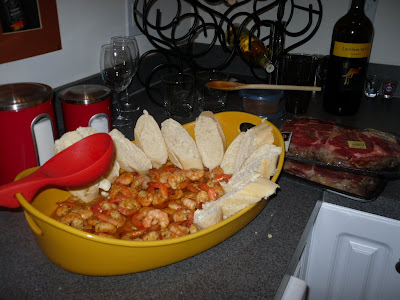
Melt butter in a skillet with olive oil. Add all ingredients except shrimp. Cook over medium heat for 10 minutes. Add shrimp and cook till pink (this will happen quickly, keep an eye on it).


So simple, so delicious. Serve with a crusty bread or serve over rice.

Be sure to put out an extra bowl to catch the shells.
The proper way to eat this is suck the juice off shrimp body. Then shell the shrimp, discard shell and eat the shrimp!! Think crawfish boil.
DO NOT waste any of the delicious juices!


This is a great appetizer. Seen here we used it as the surf in a surf n turf dinner. If you can share it with other people that is.
I hope enjoy this recipe as much as my family and I do.

*photos courtesy of whitney.

Thursday, April 21

Spring Planting

Its that time of year again. We all look forward to the 'nice' warm weather of impending summer. But don't forget that with the warm weather comes beautiful flowers and tasty homegrown foods. Why not take advantage of nature's bounty?

It only takes a little effort to have a beautiful array of flowers or a tasty garden of vegetables and herbs.

Personally I have a brown thumb which my husband will tell you immediately at any chance he gets. But I still persist. I have tried seeds, vegetables, herbs, and flowers. For the most part I can barely handle keeping an annual flower and herbs alive. Vegetables never produce and seeds don't get past infancy. It's sad I know. But that's why I'm sticking to what I know. And what will bring me joy.

I decided to go with Mint, Rosemary, Basil, an annual flower and Paul chose a Thai Pepper plant.


I wanted to get the herbs I use the most in the kitchen and are hard to kill. Fresh herbs are great but costly at the grocery store. So for a small investment upfront I can get my own fresh herbs without leaving my apartment. Mint is not something I use a ton while cooking. But I LOVE the smell. It just calms me and puts me in a good mood instantly.

All you need is:
Plants - of your choosing
Soil - better to get more than less
Small shovel or cup - for scooping
Pots - get them the recommended size or as large as the you want the plant to grow
Fertilizer - I chose an organic type, since I will be eating the herbs
Sunny spot - some plants require more sun than others
Watering can or larger cup - getting a cute watering can might help encourage you to water the plants

Choose a warm day and put on some clothes you don't mind to get dirty. Don't plant too early you don't want your plants to get burned by a sudden frost.
Place an inch or 2 of soil into the bottom of the pot (depending on the depth of your pot). Check by placing the plant in the pot to make sure the base of the plant comes to the top of the pot. Remove any wrapper or plastic pot from the outside of the plant.
Place plant inside new pot and add soil loosely around the sides. Do not pack the soil. The roots need to be able to grow freely.
Fertilize and water for the first time.


While I was already sweaty and dirty I took the time to clean up the rest of my porch. Although I got some strange look from my neighbors.


It's worth the effort to have your own fresh herbs. And if you actually have a green thumb or a yard to plant in go crazy! Get some vegetables or fruits or berries! It might take to you a few years to figure out what works well in your yard, but there is nothing more rewarding then producing your own food. 

It's a great way to teach your children about where food comes from. You can always use an extra set of hands to plant, weed, and water. I always groaned when being forced to do these things as a kid. But now I cherish that time I spent with my dad out in our yard. We had a garden to be proud of!

Mussels in White Wine

This is one of those every now and again delicacies in my house. Mostly because I usually have a hard time getting my hands on fresh mussels. But I actually tried this recipe with frozen clams and it worked good too! If you are a shellfish lover but are scared to cook them. Try this recipe its easy and tasty.

Mussels in White Wine

1-2 lbs. mussels or clams
2 cloves of garlic, sliced
1 shallot, finely diced
olive oil
3 tablespoons of butter
1 teaspoon of thyme
1 cup of white wine
1 lb of fettuccine noodles
Parmesan cheese for garnish
side of crusty bread

Defrost if frozen. Rinse and clean shellfish. Clean off beards and give them a scrub. 
Boil noodles and drain.
Add oil to a large stockpot. Add butter to pot. When butter is melted add in the shallot and garlic. Cook till softened. Add thyme. Add the shellfish and white wine. Cover pot cook for 8-10 minutes on medium. (you are steaming the mussels so the wine should be a low simmer) Remove the shellfish from the broth. Leave broth on low while you remove the mussels from their shells. Discard shells and add flesh back into the sauce. Continue to simmer sauce. Add drained noodles to pot and toss to coat all noodles. Garnish with Parmesan.
Serve with a crusty bread to catch and leftover juices.


You can also serve as a steam pot. Skip deshelling them and just transfer the pot contents to a bowl. Set out another bowl for shells. And enjoy with bread. Don't miss out on that sauce its priceless!

One time we didn't have bread to eat with it. So I saved the sauce in a plastic container. Then reheated it in a skillet and added cooked noodles. Yeah. I'm crazy about this dish.

Monday, April 18

Easter Crafts

Easter is a wonderful time of year. Another one of those holidays that been commercialized just enough to stuff ourselves with sugar and chocolate. We celebrate cute bunnies and chicks to remember the renewal of life.

Well I won't go to in depth into the history and lore of Eastertime. I know some Moms out there are groaning thinking about all the time and money and effort. Another holiday to bring a classroom full of kids cards and candy and "what I have to make it cute too?"

All right breathe a sigh of relief. I have some ideas for you.

First one the plastic Easter egg and jellybeans. Seal the eggs with a cute sticker or label with each child's name. Cute, cheap, simple. Kids want some colorful and sugary. Mission accomplished.


Not exciting enough. Okay. Well here is another egg-shaped idea.


I found a cute site with a recipe Sunflowers in my Kitchen.

Rice Krispie Easter Eggs
4 Tbsp butter
1 10 oz bag marshmallows
8 C crispy rice cereal
4 colors of food coloring

Melt the butter on the stovetop. Melt the marshmallows with the butter.
When the marshmallows are melted, have ready 4 bowls big enough for room to stir 2 C rice cereal in with 1/4 of the marshmallow cream. Also have the food coloring ready. Add 1/4 of the melted marshmallow to each bowl, add in desired amount of coloring and stir. Mix 2 C of rice cereal into each bowl until fully combined.
When the cereal and marshmallow is fully mixed and cool enough to handle, take ~1/3-cup-sized pieces of the mixture and form into eggs. (Tip: if your hands get to sticky, wet them slightly while handling the mixture) Set eggs aside to cool, not touching each other.

Well maybe you don't have a classroom full of kids to supply with Easter fun. So you just want to make some memories with you kids. Crafts are great fun. And you can keep them for years as decoration or just a tool of torment to show your children, "You made this when you were 4, its it just adorable?" Yeah be that mom.

On the site Family Fun Crafts I found the instructions for yarn balls.


Its a messy kind of fun. Your kids will love the mess, you'll love the decoration. 

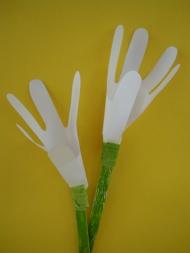
Younger kids in the house try this cutie, I found on Busy Bee Kids Crafts. Handprint lilies! So cute.

Make a bunch and put them in a vase. Beautiful centerpiece for Easter dinner.

There is always egg dyeing and Easter egg hunts. Easter brunch and Easter dinner. This is just to get you thinking about this most wonderfully sweet time of the year.

Sunday, April 17

Easy Lemon Chicken Pasta

I love this recipe because its quick, easy and cheap.  I like to plan it for those nights I don't want to put a lot of effort into dinner. But I always something that fills me up with great flavor.  The Neely's from Food Network really have this one figured out. These are very affordable ingredients some of which you might already have in your pantry.


Easy Lemon Chicken Pasta

1 pound dried penne
2 chicken cutlets, cut into fingers
Salt and freshly ground black pepper
3 cloves garlic, sliced
1/4 teaspoon red pepper flakes
3 tablespoons olive oil
3 tablespoons roughly chopped fresh parsley
2 lemons, juiced
1/2 cup grated Parmesan (You can use the Parmesan 'dust' but I recommend getting a cheap block of Parmesan and grating it up. It's worth the extra couple of bucks and it'll last through a few meals.)

Cook the pasta in a large pot of boiling salted water, until al dente. Drain well.
Season chicken with salt and pepper. Heat a large grill pan over medium high and add chicken. Grill until golden and completely cooked. Remove to a plate and slice.
Add the garlic and red pepper flakes to a saute pan with 3 tablespoons of olive oil and saute until fragrant. Add the cooked pasta and turn heat off. Mix all together.
Remove pasta to a large bowl. Add chicken to the warm pasta and season with salt and pepper. Sprinkle in chopped parsley. Add the juice of 2 lemons and mix. Before serving top with Parmesan.


Give it a try you won't be disappointed.

Organize Dinnertime

This post is meant to be an organizational idea. A way to make that "What's for dinner?" question a little less painful. And an attempt to make grocery shopping slightly more tolerable.

To make my grocery shopping life a bit easier there are some things that I try to buy in bulk:
Chicken breasts
Canned tomato products - paste, diced, sauce
Spaghetti
Olive oil
Popcorn
I see these particular items as necessities that deserve the space they take up in my pantry/freezer.  Its nice to know I can always pop a bag of popcorn. Simple things like this are a comfort on a stressful day.
I also like to have a few "go to" meals, such as spaghetti with marinara or grilled chicken breasts. These items are also a base for many meals.
Basically watch what kinds of things you buy EVERY single week. Get them in bulk. Big cereal eater? Bulk it out. Epic coffee drinker? Go bulk! Buy smart, just be careful don't be wasteful.

One of the greatest allies in my dinnertime successes is my "Chow Planning" pad.


A few bucks at Target bought me weeks of organization. This is a night by night planner with enough room in each day to write the main dish and sides! Also at the bottom there is a place to write up a grocery list. Take the whole thing with you to the grocery and don't forget anything for any recipe ever again. Reducing those needless trips to the grocery store to pick up that one thing you forgot, where you come out with three bags of stuff you saw you might need. Ugh.
Maybe everyone is not as passionate about saving time and money as I am... wait who here doesn't want to save time and money? Really?

Every weekend I write on the back of the previous week's list ideas for the coming week's dinners. (Just to save a piece of paper. Or start a dry erase boards with ideas throughout the week.) I try to have a few cookbooks out and sit next to my computer for internet access with a couple of my favorite foodie websites on screen. (Also employ your grocery store's ads, this will give you ideas while save money.)
After coming up with 7 excellent ideas I will compare the difficulty of preparation (leave the easy stuff for a long day and time intensive meals for your day off) and freshness of ingredients (cook fresh fish early in the week) to my schedule. This gives me the most accurate reading on what night to cook what.


 Okay that might sound complicated. But trust me its a lot less work then trying to scrounge together miscellaneous ingredients for dinner every night.

Get the family involved in coming up with ideas and get suggestions on when they would like to eat those meals. If you try this method you will have a lot less waste and a lot less arguments about meal ideas.

There are still some nights that things don't work out and we end up going out to eat or ordering in. Then I end up shuffling the meal planner around. But in the end I know I have the food to make those meals later. It's very comforting.

You don't need some fancy pad of paper with the days of the week printed on it. That's just for funsies. Take 30 minutes or an hour of time, then have your grocery list done and a full week's worth of dinner ideas ready prepared for the week ahead!

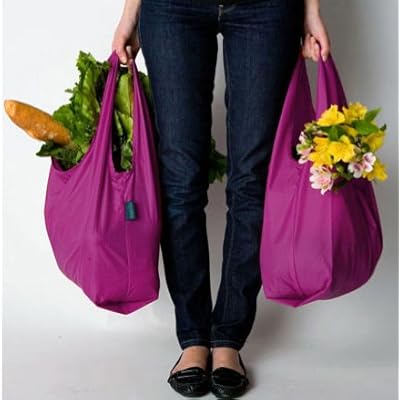
And don't forget your reusable bags for the grocery store.

Saturday, April 16

Make Your Own Ice Cream

This is a great rainy day activity or hot, sunny day. It is fun for groups, kids or adults, parties, holidays. This was a family tradition for us to make homemade ice cream on 4th of July.

Just remember that this idea does require some special equipment and foresight. Make sure you have a good recipe... and all the ingredients.

Also if this is the first time you are using your machine be sure to read ALL the directions.
Like our new machine explains you have to freeze the container for at least 8 hours. Of course we were intending to eat the ice cream sometime today... so... We decided to give it a try after freezing it a significantly shorter amount of time.

We decided on a recipe from ice-cream-recipes.com.

Strawberry Ice Cream

3 egg yolks (beaten)
1/2 pint milk
1/2 pint heavy cream
4 oz sugar
2 cups of strawberries
1 teaspoon of vanilla extract

Take the strawberries and mash them in with half the sugar in a bowl. Place in the refrigerator while making the rest of the recipe.
In a separate saucepan, mix the egg yolks with the milk, salt and the remaining sugar. Place over a medium heat just to boiling point (stirring all the time). DO NOT LET IT BOIL.
Transfer the mixture into a chilled bowl to cool. When cool place in the refrigerator for up to 3 hours, remembering to stir the mixture from time to time. When cool, stir into the mixture the cream and vanilla essence and then blend in the strawberry/sugar mixture.
Transfer the complete mixture into an ice cream maker and follow the manufacturer's instructions.

But instead of the strawberries we added homemade cookie dough. Yum Yum.


We did have to eat half of it before we added it to the ice cream. And we even have leftover cookie dough frozen and ready for baking at a later time.

Paul found a egg-less cookie dough recipe, which I like to call the...

Edible Chocolate Chip Cookie Dough

2 cups of all purpose flour
1/2 teaspoon salt
3/4 cup melted butter
1 cup light brown sugar, packed
1 Tablespoon vanilla extract
4 Tablespoons of milk
1 bag of semisweet chocolate chips (we used mini chips)

Mix all ingredients in a bowl. Add a splash water if the dough doesn't come together.
Roll into a several logs and wrap in plastic wrap. Place in the freezer for at least one hour. Chunk up and add to ice cream during freezing process.


You can put just about anything you want in your ice cream. Some additives might require a special recipe. We also added half of a vanilla bean for the classic specks and flavor. (And well because I had some, so why not?)

It will be softer then your typical 'grocery store' ice cream. If you were to leave it in your freezer for several days then it would possibly get that hard. Most likely it won't last that long.


Good luck and enjoy!

Friday, April 15

Mexican Night

All right so sometimes I need a little international inspiration to come up with dinner ideas.  What better of a destination to start then Mexico! Everyone knows what a fiesta is! Its good to position this meal around Wednesday to help get over that midweek hump.

This is not just about one simple recipe but an experience. You can always add more or less to this dinner extravaganza.

First off is get the tequila! You can't have Mexican night with some margaritas (on the rocks of course). Okay, well maybe you can, but it sure makes more festive. Just a tip, do not drink more than one margarita while cooking. The food might still taste okay by the end, but it'll taste better if you can remember what you were cooking by the time the food is done. Ha!


My first actual recipe comes from an excellent cookbook that I definitely recommend, especially if you like to see photos of what you are attempt to make.  It has a color photo of every dish in the book, it also has recommended cooking times and techniques for common dishes.  Kitchen Bible (c) 2008 is a great addition to your bookshelf.


Cheese Enchiladas
Sauce: 
Olive oil
1 large onion, chopped
2 garlic cloves, minced
1 Tablespoons chili powder
1 teaspoons ground cumin
1-1/4 cups chicken broth
1/3 cup tomato paste
salt & pepper to taste
Filling:
1 red onion, finely chopped
1 red pepper, chopped
2 cups shredded Monterey jack cheese
8 flour tortillas (or corn is you want it more traditional)

To make the sauce, heat the olive oil in a saucepan over medium heat. Cook onion until golden, add garlic, then chili powder and cumin.  Add stock and tomato paste simmer for 5 minutes.  Season with salt and pepper.
Preheat oven to 350 degrees F. prepare filling, heat oil in pan over medium heat cook until the onion and red pepper are tender.

Lightly oil baking dish. Spread each tortilla with a spoonful of sauce. Top with equal amounts of filling and cheese. Roll up and place in dish.
Spread remaining sauce over tortillas and sprinkle with cheese.  Bake 20 minutes or until sauce is bubbling and cheese is melted.
*You can add cooked shredded chicken or ground beef into the filling if desire.

This is not a picture I took. Just a search on google images.  I will try to include pictures of my own when possible.

Another fun recipe to you can include in your Mexican fiesta.  A good one from foodnetwork.com courtesy of Pat and Gina Neely.

Steak Fajitas

Marinade: 

1/2 cup olive oil
4 tablespoons tequila
4 tablespoons fresh lime juice
1 tablespoon lime zest
4 large garlic cloves, smashed
1 jalapeno, chopped
2 tablespoons honey
1 teaspoon ground cumin
Salt and freshly ground black pepper
1 (1 1/2 pound) skirt steak, cut in 1/2
2 tablespoons olive oil
1 poblano pepper, sliced
1 red bell pepper, sliced
1 large onion, sliced
Salt and freshly ground black pepper
18 flour tortillas
Fresh sprigs cleaned cilantro, for garnish
Lime wedges, for garnish
Sour cream, for garnish

Mix all the marinade ingredients together in a large resealable plastic bag. Add the steaks and refrigerate for 1 to 4 hours.
Heat a cast iron grill pan over medium-high heat. Remove the steaks from the marinade and wipe off the excess. Cook the steaks for 3 minutes per side for medium-rare. Remove from grill pan to a cutting board and tent with foil. Let rest while you cook the peppers.
Heat a large cast iron skillet over medium-high heat and add the olive oil. Add the poblano, red bell pepper, and onion and saute until tender and softened. Season with salt and pepper, to taste. Remove to a bowl.
Wipe out the cast iron skillet. Toast the tortillas, until warm and slightly puffy. Remove and wrap in a clean kitchen towel to stay warm.
Cut the steak across the grain into thin 1/2-inch strips. Arrange on a large platter with the vegetables, cilantro, lime wedges, and sour cream.


So tasty but don't forget about the sides. Oh yes I have easy suggestions there too.  Now for the longest time I haaaaaaated black beans. I would only eat refried beans with an Mexican type meal.  Until I found this recipe by Melissa D'Arabian off Food Network.  Yeah yeah I know a lot of Food Network stuff. Its a great place for food ideas.  And the instructional programming is very entertaining.

Perfect Black Beans
1/2 pound dried black beans (I always sub in 2 cans of drained and rinsed black beans)
1 medium onion, roughly chopped
3 fresh garlic cloves, pressed
1/2 teaspoon dried oregano leaves
1/2 teaspoon ground cumin
Pinch red pepper flakes
2 teaspoons sugar
2 tablespoons white wine vinegar
Salt and freshly ground black pepper

The night before, soak the black beans in a large pot of water. The next day, rinse the beans, cover with 3 cups of fresh water and bring to a boil over high heat. (Or if you choose my short cut just drain and rinse the beans and get them in a pot with either water or chicken broth to cover.) Reduce the heat and simmer covered for 30 minutes, skimming off any foam. Stir in the onion and simmer 30 minutes more. Add the garlic, oregano, cumin, and red pepper flakes, and simmer uncovered for 30 minutes, stirring occasionally. Stir in sugar and vinegar, and taste before seasoning with salt and pepper. Turn out into a large serving bowl.


Most of the time we have a Spanish style rice with our Mexican meals. I personally like the Zatarain's Spanish rice.  You just need a can of diced tomatoes to add in.

Don't forget some Mexican hot sauce, such as Cholula.  And guacamole.

Quickie Guacamole
2 avocados
2 roma tomatoes, chopped, remove seeds
1/2 onion, finely chopped
1 garlic clove, pressed
fresh lime juice
salt and pepper to taste

Pit the avocado by cutting in half longitudinally and hit the knife into the pit and twist.  This should work with a ripe avocado.  Scoop out the tasty green pulp.  Mash together with the remaining ingredients. If you need to refrigerate place plastic wrap directly on the guacamole to reduce air touching the avocados that tend to brown like apples when exposed to air.


This is great for a group of friends or just you and yours. Remember to make it a fiesta.  Have the drinks ready, even if they are virgin.  Chips and salsa are always part of the party.  

Mexican food is easy, cheap and delicious. And much more figure friendly (as Rachel Ray would say) if you make it at home!

Don't forget this is merely a place to obtain ideas.  Even if you choose all, one or none of these recipes, you might be inspired to dig up your own recipe ideas of a Mexican ideas!

Vaya el partido! (Go Party!)

Animal totes/purses

This idea came from a forum post I found while searching for sewing crafts related to owls.  Yes I know my obsession with owls continue.  What can I say they are cute. I found a post on craftster.org http://www.craftster.org/forum/index.php?topic=366907. I thought it was clever to use an old men's wool jacket for such a cute craft.

Okay so I don't own any old men's suit coats. So instead I scrounged the fabric scrap bins at my local fabric store for a suitable (pardon the pun) fabric.  I found a decorator fabric that had a similar style to the menswear. With some felt, embroidery thread, cotton lining fabric and cute buttons I was off on an adventure to figure out my own pattern for this cute creation.

This is what I came up with...


I would love to give you step by step instruction on how I made this, but its mostly a blur now.  It was very time intensive and took a lot of motivation to complete.  Motivation I typically do not have.

After posting a picture of this purse on my facebook I immediately had requests from family and friends to make them versions of their favorite sea creatures.

So I undertook two more purse and tote projects.  I was nervous.  As I have said before just because I have these ideas for projects, it does not mean that I will have the motivation to complete them.  Somehow the thoughts of disappointing my sister and good friend was enough of a catalyst to create them their requests.

First was the Octopurse for my sister.


She is studying biology at UC Berkeley. She mostly studies crabs, but she has a soft spot (kind of punny) for octopi. She studied under a professor at UNC Chapel Hill that did biomechanic studies on octopus tentacles. Well and the fact that octopi are just really cool creatures and extremely intelligent.

Sorry random tangent... I made this purse similar to the owl purse. It has two interior pockets and velcro to secure the top.  I used embroidery thread to shape out the tentacles.  And yes there are eight. Button eyes and a sweet thread smile finish him off.

It was another time intensive project.  The legs took forever. But it was definitely worth it.  Anything for my big sis.

The last one I have made is for my Asheville buddy.
She also have a random soft spot for jellyfishes. I know she doesn't carry any purse but the one that she currently owns. So I thought of making a tote instead of a purse.  Part of this decision was selfish, because I thought a tote would be easier to produce.


So the jellytote was born.  I turned out pretty cute.  And it did end up being much easier to make then the purses.  Much simpler design.  No cute button eyes. Although I had to incorporate purple since its her favorite color.  I like using information like that to make the creation even more special for the person I am making it for.

I suppose I could have cut up this post into three different posts.  But since they were all created from the same basic idea. I thought this was more appropriate.

If you would like more instruction for these bags just let me know.  I might be able to explain it better one on one. 

This is a good idea for a rainy weekend.  Or if you need a gift for a special friend that seems to have everything.  Create your own! They won't have anything like it already!

Owl Coin Purse

This is one from an Etsy store by keykalou.
 I won't be able to give directions for this one.  But if you want to visit her etsy site the pattern is only $5.00.
http://www.etsy.com/shop/keykalou

The idea for this project came from a friend on facebook.  She noticed this pattern on etsy and sent me the link.  She knows how obsessed I am with owls and once I saw the product I knew I had to give a shot.  Normally I wouldn't take on a sewing project with more than two steps.  But what the heck its too cute not to attempt. So I made two so far. 


 It turned out pretty well. No where near perfect, but it was cute and it made me smile.  What could be better?

It only required a few pieces of scrap fabric, velcro, button eyes, and some interfacing.  I bought the fabric from the scraps bin at my local fabric store at 80% off their normal value per yard.  All in all it didn't cost much more than the change that would fit inside it.

It could be cute gift for a friend.  A fun way to give a gift card. A place to keep some mad money. Or any little trinkets. It could even be a chance to make a few extra dollars on etsy.com. 

Give it a try. It's not that hard and doesn't take a long time to make.  My favorite kind of crafts.

Chocolate Stout Cake

I was trying to think of a fun place to start my idea station.  Then I realized where is a better place to start then a chocolate cake made with beer! Excellent idea!
I have always pined for the Highland Stout cake at the French Broad Chocolate Lounge in Asheville, NC.  It's absolutely divine.  Every time we visit this amazing restaurant I HAVE to order this cake.  Everything on the menu is amazing (I have tasted other desserts), but I can't help myself. This cake is just too good to pass up!
Anyway... I had been debating on how I could recreate this dessert at home. One January day I was reading the December 2010 issue of Real Simple magazine p. 266 and there it was! A Chocolate Stout Bundt Cake!
I decided to wait till Valentine's day to bake this creation.  Also I had to modify the recipe because I don't own a bundt pan.  But that was okay, I wanted a cake.

So this is what I came up with.  The cake recipe is a slight variation of the one from the one in Real Simple and the buttercream recipe is something I found on foodnetwork.com from Paula Deen.

Chocolate Stout Cake with Coffee Buttercream

Cake:
1 cup softened unsalted butter, plus more for pans
2-1/2 cups flour, leveled
3/4 teaspoon baking soda
1/2 teaspoon salt
3/4 cup stout beer (such as Guinness)
12 oz. semisweet chocolate, chopped or chips
3 large eggs
1 cup sugar
1 cup packed dark brown sugar
1/2 cup sour cream
1/2 heavy cream

-Preheat oven to 350 degrees. Butter 2 8x8 pans. Whisk together flour, baking soda, and salt.
-In a small saucepan, combine butter and stout. Cook over medium heat, stirring, until butter is melted. remove from heat and add 8 oz. of chocolate. Whisk until smooth.
-Use electric mixer, beat eggs and sugars on medium-high until fluffy. Beat in the chocolate mixture and sour cream. Reduce speed to love and gradually add flour mixture until just combined. (do not over mix)
-Pour into the prepared pan and bake until a toothpick comes out with a few moist crumbs, 30-45 minutes. Let cool in pan for 30 minutes then invert onto a rack to cool completely.
-In a small saucepan, bring the heavy cream to a boil. Remove from heat and add remaining 4 oz. of chocolate. Let sit for 5 minutes. Whisk until smooth. Drizzle on cake after icing.

Coffee Buttercream:
3 cups powdered sugar
1/2 cup softened butter
1/4 cup strong coffee, cooled

-Mix with electric mixer the sugar and butter until smooth. Then mix in coffee.
-Ice cake when completely cooled.
-Do a layer of icing between the two cakes as you stack.


I also added some crumbled up Ferrero Rocher chocolates on top and dusted it with cocoa powder. It was great.  It even got more moist throughout the week. Just be sure you have more than just your significant other to share this cake with. Its a big one and very rich!  But not too sweet.

Enjoy!

Random Inspirations

I have decided to make my blog into an idea station.

Whether you need dinner ideas.

Dessert creations.

Crafty inspirations.

Sewing projects.

Kid diversions.

Now I'm not going to pretend that I have all these ideas floating around in my head all the time.

But to be honest I am much better at coming up with ideas then actually producing them.  Also I really good at cultivating other people's ideas.

Those of you that know me well might agree with me on this thought.

Anyone that has an great idea please email me, call me, comment and share.  I will of course give full credit to you.

I want this to be a fun place to come a check out some neat ideas for different stuff.  Random stuff!

...Now where to begin.