Friday, April 29

Cadbury Egg Brownies

This idea came from my bestest friend Laura. This is an excellent idea to use up that extra candy. Assuming that you have extra candy...

I took a recipe from Food Network and modified it to her specifications.

Deep Dish Brownies

3 tablespoons unsalted butter
2 tablespoons canola or other neutral tasting oil
4 ounces semisweet chocolate, coarsely chopped
3 Cadbury cream eggs, chopped
3/4 cup packed dark brown sugar
1/4 cup white sugar
2 teaspoons pure vanilla extract
1/2 teaspoon fine salt
2 large eggs, cold
1 tablespoon cold brewed coffee
1/4 cup cocoa powder
3/4 cup all-purpose flour
1/4 teaspoon baking soda


Heat oven to 325 degrees F. Use an 9x9 silicon baking pan or line a similar sized metal or glass baking dish with foil so it hangs over the edges by about 1 inch. Spray the prepared pan completely.
Put the butter, oil and chocolate in a microwave-safe bowl, and heat at 75 percent power for 2 minutes. Stir, and microwave again until completely melted, about 2 minutes more. 
Stir the brown and white sugars, vanilla and salt into the chocolate mixture with a wooden spoon. Add the eggs and coffee and beat vigorously until fully incorporated and the batter is thick and glossy. Add the cocoa, flour and baking soda and stir just until it disappears.
Pour the batter into the pan and bake until the top is crispy and a toothpick inserted into the middle comes out with a few crumbs, about 30-40 minutes.
Cool the brownies in the pan on the counter. Lift brownies out of the pan by the foil, if needed. Peel off the foil and cut into 2-inch squares.


 The brownie recipe is a healthy version of brownies. As healthy as brownies can be I suppose. They came out not too sweet, fudgey and fluffy.

I would make these again, with or without the Cadbury eggs. 
I think this is a clever idea to use up some candy. Or a fun excuse to make brownies.

Enjoy! And thanks Laura to for the tasty idea.

Thursday, April 28

Sugar Cookies

So to be honest I'm not a fan of sugar cookies. Especially those hard, crumbly ones covered in super sweet icing. It's not my thing. So I found a recipe that hit the spot. Alton Brown, Food Network's recipe master put together this gem.

Sugar Cookies

3 cups all-purpose flour
3/4 teaspoon baking powder
1/4 teaspoon salt
1 cup unsalted butter, softened
1 cup sugar
1 egg, beaten
1 tablespoon milk
(1 teaspoon vanilla extract, I added this for extra flavor)
Powdered sugar, for rolling out dough

Sift together flour, baking powder, and salt. Set aside. Place butter and sugar in large bowl of electric stand mixer and beat until light in color. (I don't have a stand mixer, I used a hand mixer) Add egg and milk and beat to combine. Put mixer on low speed, gradually add flour, and beat until mixture pulls away from the side of the bowl. Divide the dough in half, wrap in waxed paper, and refrigerate for 2 hours.
Preheat oven to 375 degrees F.
Sprinkle surface where you will roll out dough with powdered sugar. Remove 1 wrapped pack of dough from refrigerator at a time, sprinkle rolling pin with powdered sugar, and roll out dough to 1/4-inch thick. Move the dough around and check underneath frequently to make sure it is not sticking. If dough has warmed during rolling, place cold cookie sheet on top for 10 minutes to chill. Cut into desired shape, place at least 1-inch apart on greased baking sheet, parchment, or silicone baking mat, and bake for 7 to 9 minutes or until cookies are just beginning to turn brown around the edges, rotating cookie sheet halfway through baking time. Let sit on baking sheet for 2 minutes after removal from oven and then move to complete cooling on wire rack. Serve as is or ice as desired. Store in airtight container for up to 1 week.


Okay so this looks complicated. Well as far as I'm concerned it is. But that's because I do NOT bake. I do Not like to bake. Me and baking are not friends. I always forget some important part of the process. And the whole thing fails.

So I was excited that the first time I made these I was able to not fail. I saved the second part of the dough and rolled it out a few days later and baked up some more stars. Of course they aren't perfect because I forgot to grease the cookie sheet and I tried to cram them all on one cookie sheet. But I don't mind if they look crazy, as long as they still taste good.

A word of warning. Try not to take shortcuts. The closer you follow this the better the cookies will be. Alton Brown is very specific and scientific with his recipes. There is an important reason for every step.

They turned out soft and melt in your mouth delicious. I suppose you could put icing on them too, but they were good enough without.

If you like sugar cookies give it a try and this might be one of your new favorites... if you don't like sugar cookies give it a try and it might become one of your favorites.

Wednesday, April 27

Simple Spaghetti

This is an easy, quickie recipe that tastes great! It is a culmination of a Rachel Ray recipe and my own experience. I love pasta!

Simple Spaghetti

olive oil
2 cloves garlic, chopped
1/4 teaspoon red pepper flakes  
1 small can tomato paste
1 can diced tomatoes, drained
1 can tomato sauce
1/8 teaspoon cayenne
1/2 teaspoon dried oregano
1/2 teaspoon onion powder or 1 medium onion, chopped
salt and pepper
3-4 fresh basil leaves, chiffonade


Heat oil in a saucepot. Add garlic and red pepper flakes (add onion at this point if you are using fresh). Once the garlic develops some color, add in the tomato paste. Stir to combine with garlic and oil. Add in drained, diced tomatoes and tomato sauce.  Stir to combine. Add onion powder, oregano, cayenne and salt and pepper to taste. Stir and let simmer for about 10 minutes or longer. Add fresh basil at the end let it simmer only for a few minutes before serving. Serve with any kind of pasta, I like angel hair. Top with Parmesan cheese. Add bread and salad for a full meal!


This is a meal for my own taste. Be sure to try the sauce while adding spices and herbs. Try it with dried basil in the winter. These measurements are fairly approximate, I usually just sprinkle some of everything in.  

You can also add cooked ground beef or sausage. You can use it as a marinara for chicken Parmesan or really anything. It versatile and easy. 

It also makes great leftovers! (Or as my mom's friend named them Plan-overs!)
 

Now go go load up on some carbs!

Tuesday, April 26

Re-Dress

This is a post inspired by my wonderfully talented friend Bish. (Like her as CosplayRandom on Facebook)
She was actually inspired by another blogger that took on the mission of having a New Dress A Day for a year.

Bish happens to have some mad sewing skills and was able to produce a few amazing re-dresses that blew my mind. This is meant to show you that not everything is as it seems. It takes some time and skill but you could take an oldie in your closet, like this first one she did, and turn it into something new.


This dress had a few not so attractive stains on the front. I would probably have trashed it or given it to Goodwill. But not Bish. She snipped a few places. And Ta-da!


An adorable new top, just like that. That is the smile of a girl that knows she just saved a few dollars.

The next one shows us that too big does not mean all wrong.


Yeah most people would have looked at the size sticker and walked off. But Bish was intrigued by the print and neckline of this dress and just knew there was more to it.


Wowie! She sure knows her seams. Take it in, take it up and use the extra fabric to create a cinch belt. Just amazing. A sundress bought for mere change at Goodwill and transformed with a genius hand.

But that's not all.


This last dress took a few extra steps to bring it to life.


The purple dye job was first. Ya gotta go with your favorite color. Then she added some lace trim and shortened the hemline. Cute, summer-y and only a few dollars from a thrift store.

So for those of you out there that have those amazing sewing skills like Bish or Marisa. Don't just play around with patterns and new fabric. Save some time and money and go to your local Goodwill or Thrift store and see if anything inspires you.

Grandma's BBQ Shrimp

This is a family recipe I am sharing with ya'll. So listen up, this is an irresistible shrimp recipe. Don't like shrimp? Gasp. Well this is really tasty so you might even be converted. It's not what you think of when you hear BBQ. It's much better.

Grandma's BBQ Shrimp

2 lbs. shrimp, in shell (medium is the best size, popcorn is too small and jumbo don't have as much flavor)
1/2 cup butter
1 Tablespoon olive oil
1/2 teaspoon salt
1 teaspoon cayenne
1/3 cup Worcestershire
1/2 teaspoon black pepper
1/2 teaspoon thyme, dried
1/2 rosemary, dried
1/2 teaspoon oregano, dried
2 cloves garlic, chopped
2 lemons juiced

Melt butter in a skillet with olive oil. Add all ingredients except shrimp. Cook over medium heat for 10 minutes. Add shrimp and cook till pink (this will happen quickly, keep an eye on it).


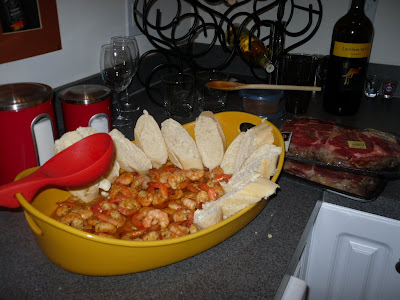
So simple, so delicious. Serve with a crusty bread or serve over rice.

Be sure to put out an extra bowl to catch the shells.
The proper way to eat this is suck the juice off shrimp body. Then shell the shrimp, discard shell and eat the shrimp!! Think crawfish boil.
DO NOT waste any of the delicious juices!


This is a great appetizer. Seen here we used it as the surf in a surf n turf dinner. If you can share it with other people that is.
I hope enjoy this recipe as much as my family and I do.

*photos courtesy of whitney.