Showing posts with label Food. Show all posts

Friday, March 14

Apple Danish Ring

From time to time we have company visit us and I feel inspired to make a special breakfast/brunch type meal. My in-laws were in town a few weeks ago and I knew that I wanted to find a really special treat to add to my brunch menus. While browsing Pinterest the week before they came and saw a recipe for a delicious Apple Cream Cheese Danish. I couldn't wait to try out this recipe on my in-laws. I had a feeling this would be right up their alley.


INGREDIENTS

  • 2 (8-oz) packages crescent rolls
  • 1 (8-oz) package light cream cheese, softened
  • 1 can apple pie filling
  • ¼ cup powdered sugar
  • 1 egg yolk
  • ½ tsp. vanilla extract
  • ½ cup powdered sugar
  • 2-3 tsp. milk
INSTRUCTIONS
  1. Preheat oven to 350º. Spray a pizza pan with cooking spray. Open both packages of crescent rolls and separate into 16 triangles. Arrange 12 triangles in a circle on the pizza pan, with wide edges on the outside of the pan and the points of the crescent triangles in the middle. Press the outer seams together, leaving the points in the middle alone.
  2. Make cream cheese filling: In a bowl, combine cream cheese, ¼ cup powdered sugar, egg yolk, and vanilla extract. Whisk until smooth. Spread cream cheese mixture evenly over the outer edges (about 2″ wide) of the dough, within about ½” of the edge. Spoon pie filling on top of the cream cheese layer.
  3. Now take the points of the crescent triangles in the middle of the pizza pan and place them up over the filling, pressing the point into the outer edge. Make your way around the pan doing this, making a circle shape.
  4. Cut the remaining 4 crescent triangles lengthwise into three strips. You will have 12 small triangle shaped pieces. Going around your circle, place the outer edges of the small triangles into the uncovered filling areas. There should be 12 “empty” spots to place your small triangles. Press the larger seams together on the outside of the ring and the points on the inside of the ring.
  5. Bake for 25-30 minutes, or until golden brown. Remove from oven and cool for about 10-15 minutes.
  6. Make glaze: combine ½ cup powdered sugar and 2-3 tsp. milk and mix until smooth. Drizzle evenly over pastry. Slice into triangles and serve.


I added this to the a buffet of fruit and some link sausages which I know is a family breakfast tradition. Voila! I sliced the apple ring into yummy wedges and they were devoured.

I have information from my mother in law that my father in law liked it so much that he requested for her to make it at their home. She even tried it with cherry pie filling, which is his favorite fruit. It was also a hit.

I loved this recipe because it was easy and quick. Two things I think that are really important when making brunch. You don't want to wait forever for the host to be cooking and baking forever! By brunch everyone is trying to politely act like its okay whenever the food is ready. But in reality everyone is starving!

I also enjoyed making this because it required just a few common and easy to obtain ingredients. And as my mother in law did you can easily make it your own and mix up the fillings.

So why not try this out on your next family get together or add mimosas and get a few friends together on a Sunday morning.

Sunday, August 5

Chicken and Broccoli Noodle Casserole

I don't know much about casseroles. My mom wasn't really into making them. We were more of a meat, starch and veggies as separate entities kind of family. But when Paul announced that he really loved broccoli I knew I needed more recipes that incorporate broccoli.
When I came across this recipes on Skinny Taste I knew I had to give it a try.

Chicken and Broccoli Noodle Casserole

 6 oz egg noodles
2 tsp oil
4 cloves garlic, sliced thin
12 oz fresh broccoli florets, chopped
1 tbsp butter
1 medium shallot, minced
3 tbsp all purpose flour
1-3/4 cups fat free chicken broth
1 cup 1% milk
12 oz cooked shredded chicken breast
4 oz shredded reduced fat sharp cheddar
cooking spray
3 tbsp shredded parmesan cheese
2 tbsp seasoned breadcrumbs

Cook noodles in salted water until al dente, or slightly undercooked by 2 minutes. Set aside.

Heat oil in a large skillet. Add garlic and cook on medium heat until golden, about 1 minute. Add the broccoli and a little salt, sauté and cover the broccoli for about 3 minutes on medium heat until the broccoli begins to soften. Set aside.

Preheat the oven to 375°. Lightly spray a 9 x 12 casserole dish with cooking spray.

In a large pot, heat butter over medium-low heat, when melted add the shallot and cook until soft, 2-3 minutes. Add the flour and a pinch of salt and stir well, cooking an additional 2-3 minutes on medium-low heat.

Slowly whisk in the chicken broth until well combined over medium heat; whisk well for 30 seconds, then add the milk and bring to a boil. Simmer on medium heat, mixing occasionally until it thickens (about 6-7 minutes). Remove from heat and add reduced fat sharp cheddar and 1 tablespoon of the parmesan cheese; mix well until the cheese melts.

Add the shredded chicken, noodles and broccoli to the sauce and mix well until evenly coated.

Pour into a casserole dish and top with parmesan cheese and breadcrumbs. Spray a little more cooking spray on top and bake for about 20 - 25 minutes. Place the casserole under the broiler a few minutes to get the crumbs crisp and golden (careful not to burn).


This is another recipe that I love to use the crockpot shredded chicken that I mentioned in my previous post. The hardest part of this recipe is making the cheese sauce. Once you get that trick down its a breeze. Its an easy, hearty, healthy and tasty weeknight meal.

If you had some non-broccoli fans in your house you might try swapping it out for some peas or green beans. Or maybe even spinach. Every vegetable tastes better smothered in a cheese sauce!

So ditch the cream of whatever casserole starter and cook up something fresh for your family and yourself!

Saturday, August 4

Southwest Chicken Chili Mac

Back when I first started browsing pinterest I was mostly into finding ideas for dinners. Now I have a whole folder full of ideas for food stuffs and another full of ideas for sweets. I love moving a pin from one of those folders into my "tried" folder.
One of the reason I made a "tried" folder was so that I could remember that I loved this recipe for Southwest Chicken Chili Mac. I was so easy and tasty I knew that I had to put it on my list of things to make again and again.

Southwest Chicken Chili Mac
by Picky Palate

8 ounces wagon wheel pasta noodles (I have also used just macaroni noodles)
2 Tablespoons extra virgin olive oil
1 cup finely chopped white onion
1/2 cup finely chopped sweet peppers (or bell peppers)
1 tablespoon minced garlic
2 cups cooked shredded chicken breast
10 ounce can Rotel diced tomatoes, mild
1 1/2 cups reduced sodium chicken broth
1/2 cup corn, fresh or canned
1/2 cup white beans, drained and rinsed
1 Tablespoon chili powder
1 Tablespoon ground cumin
1 teaspoon dry Ranch seasoning from packet
1/4 cup finely chopped fresh cilantro (optional)
cheese for topping

1. Cook pasta according to package directions. Drain and run under cool water to stop cooking. Heat oil in 9 inch deep cast iron skillet. Add onions and peppers, cook stirring until softened about 5 minutes. Add garlic and cook stirring for 1 minute. Add chicken, tomatoes, broth, corn, beans, 1 cup wagon wheel pasta, chili powder, cumin, Ranch seasoning and cilantro. Stir until well combined. Reduce heat to low and simmer until ready to serve.


It might look like a lot of ingredients but they are all pretty common, low cost items.

Another tip for this post is a how to make the shredded chicken for this meal. Throw a few thawed or frozen chicken breasts in your crockpot cook on low 6-8 hours. You can add spices like cumin, garlic powder or chili powder too. Then shred with a fork. So easy.
Sometimes I'll plan to make this and another meal that requires shredded chicken in one week, that way I can cook up a few breasts at once and then have the protein ready to go.

This meal is differently an easy crowd pleaser. Try it for kids or even some picky adults.
This post is reminding me how much I like this recipe. I might just have to put this on the menu for next week! Enjoy!

Friday, August 3

Bacon egg muffin

So just for fun a few Sunday mornings ago I decided to combine a couple of ideas from pinterest and make a special breakfast for Paul. I made a concoction that I am dubbing a Bacon egg muffin.
I unfortunately did not write down any specific measurements for this recipe. Mostly because I was just playing around in the kitchen.

Bacon egg muffin

Bisquick mix
milk
2 slices bacon, cooked and cut up
2 scrambled eggs
cheese

Cook bacon and scramble eggs. Chop up bacon and let the bacon and eggs cool a bit.
Use the instructions on the Bisquick box to make drop biscuits. I made them a bit thinner by adding a little extra milk. Pour into a greased cupcake tin. Top with the eggs, cheese and a few bits of bacon.
Bake them per Bisquick instructions. Just keep an eye on them. Remove from tin and serve warm.


They were so cute and tasty. My batch made six. So we each got three which was a pretty big portion.
This recipe would be really fun for overnight guests in the morning. Especially if they are hitting the road as soon as they get up.
I actually forgot the cheese but I want to add it the next time I make these.

You could modify these in lots of ways. Syrup for more of a pancake muffin. Or salsa and spicy cheese for a Mexican muffin.
Why not give it a go? I love to play around in the kitchen. Sometimes that's where the best recipes come from.
Breakfast is a fun and easy meal to cook. The only problem is waking up early enough to make anything before lunch!

Monday, May 14

Succulent Braised Pork

Way back in January my sister came all the way from Oakland, CA to a conference that she goes to every year that happened to be in Charleston this year. I was super excited to be able to spend some sister time together and have her see our place. I didn't know how much I was really going to see her since she did have a conference to go to after all. On the last day she was giving a presentation so I knew with all that she would be pretty busy. Just in case she had time to eat with us, I planned a few what I would call "special meals" that I would be excited to share with a guest or a sister that I never get to cook for. One of these recipes was for a braised pork shoulder which just happened to be on sale at the grocery that week.

Succulent Braised Pork
by Melissa d'Arabian

2 pounds pork shoulder, cut into 6 large chunks
Salt and freshly ground black pepper
2 tablespoons olive oil
1 onion, chopped
2 celery stalks, chopped
1 carrot, chopped
1 clove garlic, roughly chopped
2 tablespoons tomato paste
2 tablespoons all-purpose flour
1 cup red wine
1 1/2 cups beef stock or broth
1 bunch parsley stems, tied with string
2 bay leaves
1 cup water

Preheat the oven to 325 degrees F. Pat the pork dry with paper towels and season with salt and pepper.

In a large Dutch oven, heat the olive oil over medium-high heat, and working in batches brown the meat on all sides until a golden crust forms. Transfer the pork to a plate. To the pan add the onion, celery, and carrot and sweat until softened, 5 to 7 minutes. Add the garlic and sweat another 2 minutes. Stir in the tomato paste and cook for 3 minutes to cook off the raw flavor and caramelize it. Sprinkle with the flour and cook another 2 minutes to cook off its raw flavor. Whisk in the wine and reduce it by half. Return the pork to the Dutch oven, then stir in the beef stock, parsley stems, and bay leaves. Add the water if liquid does not come up to the top of the pork. Do not cover the pork with liquid. Cover the pan and place it in the oven to braise until the meat is fork tender, about 3 hours. Taste and season with more salt and pepper, if needed. Transfer to a serving platter and serve.


Sorry this picture is so lame. But I was so excited to eat the pork I totally forgot to take the picture till there was only one bite left!

This meat is so tender and packed with flavor. I like to serve it with some roasted potatoes or mashed potatoes, something to soak up the delicious juices that are left in the pot.

If you need a special meal for a special guest try this one. Or just in the mood to make something tasty for yourself. It is a slow cooking kind of meal, I would suggest making it on your day off. But it is worth the time. If you can handle smelling tasty pork all day, then go for it!

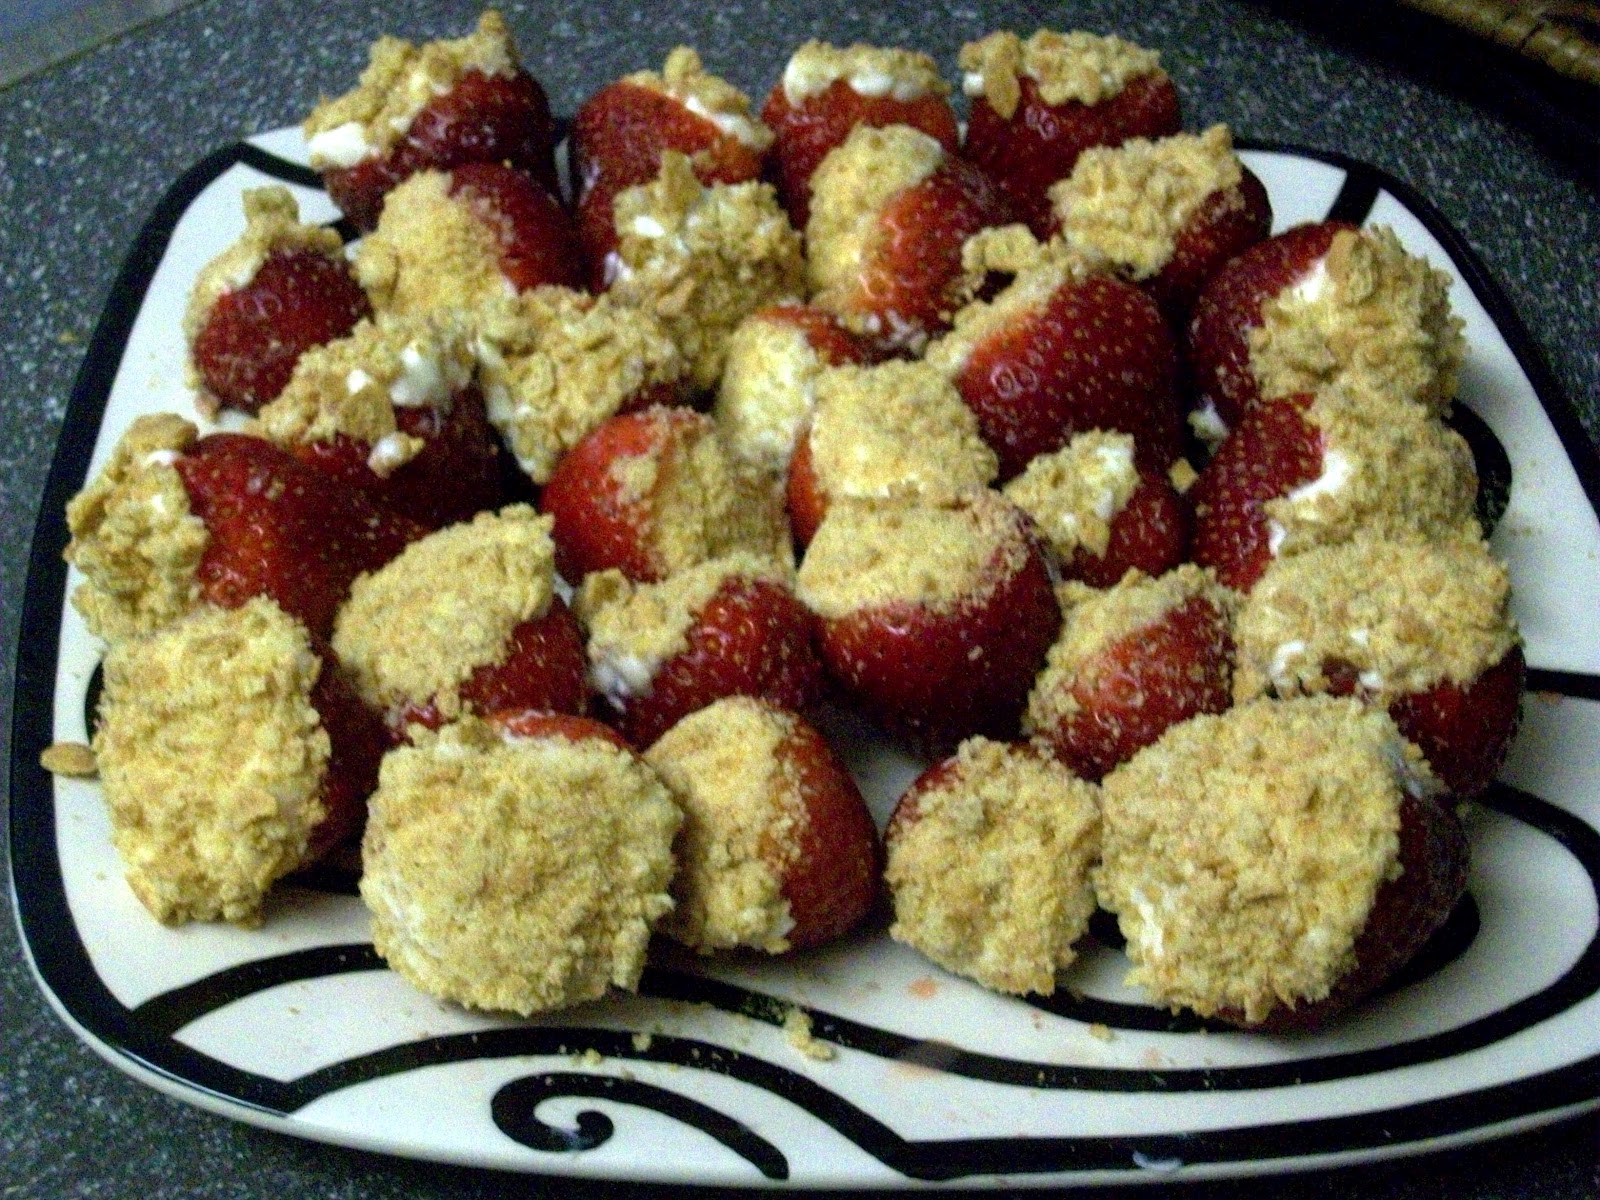
Strawberry Cheesecake Bites

All right I know that pinterest is old news by now. But as I sit here and obsessively pin things I realized that I had several new recipes to post. I figured even though I have been busy/lazy with my blog its never too late to post. I wanted to get the ball back rolling with an idea I found on pinterest.

I saw these before Paul's birthday and I just knew this had to be the first thing I tried from pinterest. With strawberries coming into season in the lowcountry and Paul loving cheesecake.

Strawberry Cheesecake Bites
by SugarDeby via pinterest

1 carton of strawberries
8 oz pkg softened cream cheese
1/2 cup powdered sugar
1/2 tsp vanilla
1 sleeve of graham crackers, crushed

Wash, cut off the top of the strawberries and then core them out. Be sure to take out enough of the core to get a healthy amount of the cheesey filling inside.
For the filling: Beat the cream cheese. Add powdered sugar and vanilla. Beat until smooth.
Fill the strawberries: Use a piping bag or a zippy bag with a corner cut off. Pipe them nice and full and dip them in the crushed graham crackers.


Mine aren't that pretty but they were a big hit at his birthday get together. We were all stuffed full of strawberries and cheesecakey filling. They might look like small bites but between a few people it was a lot of dessert!

This pin was honestly a little laborious for me. (But I was happy to do it for Paul.)

So if you haven't checked out pinterest yet or your trying to decide if its worth signing up. Do it! They are some great ideas and its an awesome way to keep all of your ideas organized. I have a whole "board" full of ideas that I have tried, that way I don't lose the information so I can try it again and again.

Monday, February 6

Jalapeno Chicken

This dish is infamous among our group of friends here in Charleston. There is a restaurant called Madra Rua where they serve as one of their daily specials Jalapeno Chicken.

I had heard about this for weeks when we first moved here last year and finally demanded to be let in on the Jalapeno Chicken secret. It was an experience I will never forget, especially the time one of my friends ordered extra cheese and they brought it to her in a small soup bowl! (Once you read though the recipe you might gather an understanding of why this is so disturbing.)

Anyway I made it one night after having leftover cheese dip I made for a party and it was a big hit. I think I was able to capture the general spirit of the dish with my rendition. I just had to write up the recipe and share it. Hopefully some of you out there will be able to enjoy the awesome that is Jalapeno Chicken for yourselves now!


Jalapeno Chicken

Cheese sauce:
1 block of velveeta
can of rotel, tomatoes and chiles
1/4 lb. ground beef
cumin, to taste
cayenne, to taste
paprika, to taste
salt and pepper
sliced pickled jalapenos

Chicken:
chicken breasts
salt and pepper
olive oil
cooked rice


Add velveeta to crockpot, allow to melt then add the rotel.
While cheese is melting saute ground beef in pan with tablespoon of oil. Allow meat to brown while breaking into small pieces. (A good trick is to add a 1/4 cup of water to the meat. That helps break up the meat really small which is ideal for the dip.) As it browns add seasonings, cumin, cayenne, paprika and salt and pepper. After it browns drain off any oil, then add to cheese mixture. Then add jalapenos. Mix well.

Season chicken with salt and pepper. Either grill or saute chicken breast with oil olive.

Lay down a bed of the cooked rice, then cooked chicken breast, finally spoon on cheese mixture.


Sunday, December 25

Christmas cookies - Mint cookies

Throughout the year I am not generally into cookies. I figure there are a lot of better ways to waste some calories on sweet treats then a mere cookie. Between that an my hatred for baking, fresh baked cookies don't appear too often in my home.

Thinking back this was the time of year that fresh baked cookies would make an appearance in my family home. So I thought I would continue the tradition.


We would decorate cookies every year and leave some for Santa.


With a note and milk of course. We also left a few carrot sticks for the reindeer. We knew that not everyone remembered to leave the reindeer snacks.

Decorating cookies isn't really what I wanted to post about though. I just wanted to share a few nostalgic photos.

What I really wanted to share is a few recipes that I think of as Christmas cookies. The first is one from my mom's recipe book. I tried to make these myself this year and had a huge fail! They still tasted okay but there was too much butter and the cookies spread out waaaay too much. (maybe next year...) The other recipe I found on foodnetwork.com and had great success with. This recipe is going in my recipe book. They are both excellent recipes. Just like with any other baked good remember to not be lazy like me and measure carefully. Ha.

Melt-Away Peppermint Wreaths

1-1/4 c. butter, softened
3/4 c. sifted powdered sugar
2-1/2 c. all purpose flour
3/4 teaspoon peppermint extract
red and green food coloring

Cream butter, gradually add sugar beating well.
Add flour and mix well. Stir in peppermint extract. Divide dough in half and place in separate bowls. Tint half with the red food coloring and the other half with the green.
Roll dough into balls using 1/2 teaspoon dough per ball. For each wreath-shaped cookie, place 6 balls in a circle on ungreased cookie sheets, alternating colors. Press together securely. Bake at 375 degrees for 8 minutes.
Let cool for 10 minutes; remove to cooling racks and cool completely.


I divided the one of the dough balls in half again and left it white to also make candy cane shapes. This picture was taken before they went in the oven. Sadly I wasn't able to take a good shot of them after they came out. Actually looking at the picture I may or may not have made the balls too big as well. Oops.
These cookies are true to their name, they will melt in your mouth. A sweet buttery taste with the sharp tang of peppermint give these cookies a Christmas-y feel. The cute shapes only reinforce the holiday theme. They are a definitely classic in my book.

Delicate Mint Sandwich Cookies
by Melissa d'Arabian

Cookies:

1/2 cup unsalted butter, softened
2 ounces cream cheese, softened
3 tablespoons granulated sugar
1 1/4 cup all-purpose flour

Mint Filling:

1/2 cup confectioners' sugar
2 tablespoons butter, softened
1 or 2 drops mint extract
1 or 2 drops red or green food coloring

Confectioners' sugar, for dusting, optional

For the cookies: Preheat the oven to 375 degrees F. Cream the butter, cream cheese and sugar until smooth using a handheld mixer in a medium bowl. Add the flour slowly, mixing on low, until incorporated. Scoop the dough into a ball using your hands and cover with plastic wrap. Refrigerate until the dough has firmed slightly, about 30 minutes.
On a floured surface, roll the dough about 1/8-inch thick. Cut out as many rounds as possible with a small cookie cutter and transfer to ungreased baking sheets, leaving about 1 inch between each cookie. Re-roll the dough scraps and repeat until all the dough is used. Use a smaller cutter, about 3/4-inch, or cut freehand with a small sharp knife to punch a small window out of half of the cookies. Place the cutouts on the baking sheets.
Bake until golden around the edges, 12 to 15 minutes. Cool for 5 minutes on the baking sheets and then transfer to wire racks to cool completely.
For the filling: Place the sugar, butter, mint extract, food coloring and 1/2 teaspoon of water in a medium bowl and beat on medium speed until well combined and fluffy. Spread a thin layer of mint filling on the cookies without the windows and place the wafers with the windows on top. Sprinkle with the confectioners' sugar, if using, and serve the sandwich cookies with the cutout cookies on the side.


 A friend of mine has a picture of the ones I made. I used a star shaped cookie cutter and I did not do the cut out part. I also doubled the recipe for the frosting. When I made it looked like a few tablespoons of frosting. Haha. I knew that wasn't enough.
I, my friends, Paul and my parents loved these cookies. They are as titled delicate cookies. Not too sweet of a cookie which pairs well with the sugary frosting. Even though they are pretty labor intensive, I would like to make these again soon. Because they were really that good. But I am glad I was making them with my friend so that we could chat and cut up while making them.

Even if baking is not your thing, Christmas is a great time to flex those muscles. You can give them as gifts to those hard to buy for coworkers or take them to a church cookie walk or just enjoy them for yourself with a tall cold glass of egg nog.

Oh and Merry Christmas!

Wednesday, December 21

Mushroom Ragu

Okay so I LOVE pasta. I am always searching for the next new pasta recipe to get obsessed with. Every week I am browsing foodnetwork.com, recipe books and food blogs, to come up with dinner ideas. Anytime I come across a pasta recipe that even remotely looks good I'm all over it. This recipe popped up on foodnetwork.com's homepage one day and I was instantly interested.
I know that there will be plenty of people that will overlook this recipe because its all about the mushrooms. But come on mushrooms are such an amazing ingredient! They are earthy, meaty, chewy and take on all kinds of flavors that are added to the mix. They are a versatile ingredient that I am always excited to find new and different ways to use them.
When I read through this recipe I knew that I wouldn't be able to find some of the mushrooms that it was calling for. Usually that would cause me to pass up the recipe all together. But it popped into my head that I could use a dried mushrooms and then use the liquid that I reconstituted them in as a replacement for the chicken broth. That would add even more mushroom-y flavor. So I decided to give it a try.

Mushroom Ragu
by Giada De Laurentiis

1/4 cup extra-virgin olive oil
1 large onion, chopped
2 garlic cloves, minced
1 pound mixed mushrooms (cremini, oyster, shiitake) chopped 1 package of dried Monterey mushroom mix, chopped & 8 oz baby bella mushrooms, chopped
Salt and freshly ground black pepper
1/2 cup Marsala white wine
2 cups chicken mushroom broth
1/3 cup heavy cream
5 fresh basil leaves, chopped
1/4 cup flat-leaf Italian parsley, chopped
1/2 to 3/4 cup grated Parmesan


Reconstitute the dried mushrooms according to package instructions. Reserve liquid and chop mushrooms.
In a large skillet heat the oil. When almost smoking, add the onions and garlic over medium-low heat until the onions have wilted, about 8 minutes.
Add the mushrooms and season with salt and pepper. Raise heat to high and saute until mushrooms are tender and all the liquid has evaporated. 
Remove pan from heat and pour in Marsala white wine. Return pan to stove and allow wine to evaporate, about 3 minutes. 
Add chicken mushroom broth and simmer for 1/2 hour until the sauce has reduced by half. 
Add heavy cream and mix well. 
Take the pan off the heat and add the fresh herbs and Parmesan and mix thoroughly. 


I can't explain in a just a few words how delicious this pasta is. Other then saying that my original picture was so lame because it was a small second helping that I swiped out of the pan before it was all gone. Well I did save some for lunch the next day, because it reheats so well. I have already made this recipe twice since I found it. I'm sure Paul is already over eating it. But its so easy and so tasty that I can't help putting it on the menu.

So don't tell me how you don't like mushrooms, blah blah blah, if you don't bother to try this recipe. Just do it! You'll be glad you did and if you aren't just ship it to me. Ha!

Wednesday, November 30

Turkey Pot Pie

A few days go by after Thanksgiving and the leftovers start to lose their appeal. So begins the age old question of what to do with that pesky leftover turkey.
Two ideas popped into my head right away: turkey noodle soup and turkey pot pie. I already have a quickie recipe for chicken noodle soup, now to find an easy recipe for the pot pie. I can't really remember ever making a pot pie from scratch that made me a little nervous. Until I came upon a Sunny Anderson recipe on foodnetwork.com's redo leftovers recipe section. Sunny has never given me a recipe that I couldn't make.

Easy Chicken Pot Pie
by Sunny Anderson

1 1/2 pounds chicken tenders  leftover turkey shredded
1/2 teaspoon sweet paprika
1/2 teaspoon dried sage
1/4 teaspoon dried oregano
Salt and freshly ground black pepper
3 tablespoons extra-virgin olive oil
1 cup frozen pearl onions chopped onions
1/2 cup frozen peas
1/2 cup diced carrots
2 cloves garlic, minced
2 tablespoons all-purpose flour
2 cups low-sodium chicken stock
1 cup heavy cream
1 store bought pie crust crescent rolls, unbaked and thawed if frozen
1 egg, lightly beaten (I skipped this part, because I'm lazy)

Special equipment: 10-inch cast-iron pan

Preheat the oven to 400 degrees F.

Sprinkle the chicken tenders turkey with paprika, sage, oregano, salt and pepper. Heat a 10-inch cast-iron pan over medium-high heat and add the olive oil. When the oil begins to swirl, add the seasoned chicken and saute until cooked through, about 4 minutes on the first side and 3 minutes on the second side. Heat turkey through. Remove the chicken turkey to a plate with tongs, leaving the oil in the pan. Rest the chicken turkey for a few minutes, and then chop into 1/2-inch cubes.

To the same pan, add the onions and peas and carrots and sprinkle with salt and pepper. Stir and cook until the onions become tender, 3 to 5 minutes. Add the garlic and cook until fragrant, about 1 minute longer. Sprinkle in the flour and stir until the flour dissolves into the vegetables and juices. Add the chicken stock and raise to a simmer, stirring until thickened. Once the liquid has thickened, stir in the heavy cream. Season with salt, if needed.

Return the chicken turkey to the pan. Unfold the pie crust and place over the top of the filling, tucking the excess edges inside the pan. Brush the crust evenly with the egg wash. Using a knife, gently cut 3 vents in the top of the crust. Place in the oven and bake until the crust is golden brown, about 20 15 minutes.


I didn't let my sauce thicken enough so it was a bit runny. That was okay though, because it was delicious. I loved the heavy cream. Yes, I know its not healthy but it was worth it. The turkey was perfect in there too. And the crescent roll topping worked out even better than I thought it would. Buttery and crispy on top and a little gooey on bottom where it mingled with the filling.

I was definitely happy with the result. It was a great way to use up some of my leftover turkey. Now I just need to hide the rest of the turkey from Paul so I can make the turkey noodle soup later this week.

Simple Appetizers

I love appetizers. Its the first bite reminding you of the amazing meal to come. They stretch out conversation and entertain your tummy. The appetizer portion of the meal is sometimes my favorite part. As my dad says I'm a "bird-like eater", I like to think of it as slow and intentional bites. So for me picking at a few appetizers while a group chats away is really comfortable for me. No one judges how slow you eat and no one notices how much you eat. Plus appetizers are usually built only to be one or two bites, less chance to make a mess.

Okay enough of my rambling about why I love appetizers. I made a few yummy things for a Thanksgiving meal that Paul and I hosted this year for a few friends that were staying in town for the holiday. As much as I enjoy spending the holiday with family, working in a retail, I don't really have that option. As it is I am staying up for over 24 hours to make and eat Thanksgiving dinner and then going to work for 12 hours (9p-9a). I don't say this to get pity, I actually received enough sympathy for my schedule to go around (which I appreciate by the way). Its just to give perspective that I didn't anticipate having much energy to put into for this particular part of the meal. So I needed some quick and easy ideas. I wanted to share these ideas and recipes for some easy apps that Paul and I came up with this year.


Creamy Parmesan Spinach Dip
by Skinny Ginny


10 oz frozen chopped spinach, thawed and excess liquid squeezed out
1/2 cup light sour cream
5 tbsp light mayonnaise
1/3 cup Parmigiano Reggiano
1/4 cup scallion, chopped
fresh pepper to taste

Combine all the ingredients in a medium bowl. This can be made one day in advance and stored in the refrigerator. Remove from refrigerator 30 minutes before serving. Makes about 2 cups. Serve with tortilla chips or pita or even fresh veggies.


Cheese and Meat Plate

Colby Jack
Butterkasie cheese
Chedder cheese
Pepperjack
salami
pepperonis
dill pickles
crackers

This idea is all about what you and your guests like. These are some of our favorites plus a few classics. Just cut up cheese and roll up or spread out the meats. I did this the night before and artfully displayed it on a plate. That's the fun part for me, well and eating it.

Spicy Hummus
by Rachel Ray

1 (14.5 ounce) can chickpeas (garbanzo beans), drained
2 rounded tablespoons tahini sesame paste, found in both dairy and dry specialty foods sections
A drizzle extra-virgin olive oil
1/2 teaspoon crushed pepper flakes
1 teaspoon ground cumin
1 teaspoon ground coriander
1 clove garlic, crushed
Coarse salt
1/2 lemon, juiced

Combine beans, tahini, oil, pepper flakes, cumin, coriander, garlic, salt, and lemon juice in food processor bowl and grind into a smooth paste. Transfer to a small dip dish and surround spread with warm pita wedges. 

Though we did not make our own hummus. I could have and this is a pretty basic recipe that I thought would be tasty had I chosen to make my own. Although I don't usually use the tahini, mostly because I'm cheap and its just an added cost.

It might not be the most exciting spread but it was tasty and everyone seemed to enjoy it all. Don't forget to have fun with the plating. Sure its going to be destroyed when people dig in, but that's no reason not to wow your friends and family if even for a moment.

What are your favorite apps for a party or holiday event?

Tuesday, November 1

Lollipop Ghosts

Okay I know I should have posted this beFORE Halloween but I didn't...

This is just a cute quick craft to spruce up your candy assortment. This is something kids can help with, or like me just do because you have an extra 15 minutes the afternoon of Halloween.
I decided to take step by step photos, even though it was honestly unnecessary.\

Lollipop Ghosts

Supplies:
  • Lollipops (Toostie Pops)
  • Ribbon, gift wrapping ribbon, or just tape (I used white gift wrapping ribbon)
  • Tissues
  • Sharpie or black marker
  • Scissors

  • Cut ribbon into equal lengths. Like I say at work all the time "Batch your tasks. Doing the same thing over and over will make you move faster." (I really do say this at work almost everyday.)

  •  I folded my tissues once corner to corner to make a triangle.

  • Twist the tissue over the top of the lollipop and knot a piece of your ribbon underneath the pop.
  •  Draw on a spooky face!

  •  BOO! Add them to your candy bowl. 
    The few kids that came to our place seemed to like the cute ghosties. I was pleased with the results.

    If I had thought ahead, I could/should have made these to take to work. They could even be a cute decoration for a Spooky party.

    They are cute, fun and easy. Get the candy and you'll probably already have the rest of the supplies. Those are my favorite crafts.

    Hope everyone had a happy and safe Halloween.

    Monday, October 31

    New Bread Machine

    The second year anniversary traditional gift is cotton. Short of getting Paul some new boxers or polos, I had nothing for this anniversary. But when my mom and I came upon this bread machine in a closeout store I knew Paul would love this much more.
    Since Paul ended up being sick on our anniversary, so I decided to make a loaf of bread myself.

    Garlic Bread

    1 ½ cup Water, 80° F
    2 tbsp Butter
    4 cups Bread Flour
    2 tbsp Dry Milk
    1 ½ tbsp Sugar
    1 ½ tsp Salt
    1 ½ tbsp Dried Parsley Flakes
    1 – 1 ½ tsp (to taste) Garlic Powder
    2 tsp Bread Machine Yeast


    The top deflated a bit. I looked up some troubleshooting could be too much yeast or too much liquid. I'm not very good at "measuring" things perfectly. So either of these are possible. It didn't hurt the taste, the top just looked funny.

    I'm in search of some more tasty recipes! I found a pdf online of some recipes. But I'm trying to get inspired to do something special. Send me your recipes. I'll give them a go. Or maybe Paul will. He is the better baker in our marriage.

    Wednesday, August 10

    Roasted Chickpeas

    I love chickpeas. I'm not sure why, they really aren't anything special. But they are very versatile. They are a great non-meat protein addition. They work well for hummus, as a salad topper, and they are even great in pasta. I keep seeing this recipe popping up all over the cooking shows and blogs that I follow. So just for fun, I decided to make this little chickpea snack.

    Roasted Chickpeas

    • 15 oz can chickpeas, drained
    • olive oil spray
    • salt
    • 1 tsp chili pepper powder (to taste)
    • 1 tsp cumin
    • 1 tsp paprika
    • 1 tsp coriander
    • 1 tsp curry powder
    • 1 tsp garlic powder
    Preheat oven to 375°. Drain chickpeas in a colander and let them dry completely. Pat dry with a paper towel if needed.
    Arrange on a baking sheet in a single layer and roast for about 30-35 minutes, shaking the pan every ten minutes. All ovens are different so make sure they don't burn. They will be golden brown and crunchy on the inside when done, not moist.
    In a medium bowl, combine all the spices. Remove chickpeas from oven when done and spray with olive oil spray. Immediately toss with spices while hot. Eat at room temperature.


    I messed with the spices a little, just for my taste. I'm sure the combination that was given by Gina is also delicious. I just did a strike through on the things I omitted. The combination I used was tasty, but I might kick it up with some cayenne.

    They are a little crunchy on the outside (more so if I hadn't been paranoid they would burn) and tender on the inside. We ate most of them up before they completely cooled down.

    I give this idea a thumbs up as an alternative to popcorn or other salty snacks. They are protein packed and nutrient rich.

    Why not sub out your your impulse snack and give these little treats a try?

    Monday, August 1

    Fresh Cherry Cobbler

    When I made Cherry Sorbet a few weeks ago, I spent a long time pitting over 3 pounds of fresh cherries. I just couldn't dump the leftover puree in the trash. I saved it in a plastic container in the fridge for a few days till I could find another purpose for it. I was so excited to come across a recipe for fresh cherry cobbler on All Recipes.


    Ingredients
    • 1/2 cup butter
    • 1 cup all-purpose flour
    • 1 cup white sugar
    • 1 teaspoon baking powder
    • 1 cup milk
    • 2 cups pitted sour cherries (sub in the cherry puree)
    • 3/4 cup white sugar
    • 1 tablespoon all-purpose flour
    Preheat the oven to 350 degrees F. Place the butter in a 9x13 inch baking dish, and place in the oven to melt while the oven is preheating. Remove as soon as butter has melted, about 5 minutes.
    In a medium bowl, stir together 1 cup of flour, 1 cup of sugar, and baking powder. Mix in the milk until well blended, then pour the batter into the pan over the butter. Do not stir.
    Rinse out the bowl from the batter, and dry. Place cherries into the bowl, and toss with the remaining 3/4 cup of sugar and 1 tablespoon of flour. Distribute the cherry mixture evenly over the batter. Do not stir.
    Bake for 50 to 60 minutes in the preheated oven, until golden brown. A toothpick inserted into the cobber should come out clean. 
    I undercooked the crust a little bit. It was very buttery and very tasty. It was a great use for the leftover cherry puree. Although keep in mind that the cherry puree had a lot of the natural flavor zapped out of it, from the cherry sorbet. So that made this dessert not as cherry to the extreme in flavor.
     I served it hot with vanilla ice cream. I think it went over pretty well with everyone.
     So don't waste that leftover cherry puree. Or if you are so inclined you could just make this recipe.  
    I won't judge.

    Cherry Sorbet

    Cherries were on sale at the grocery store a few weeks ago, I just had to find a reason to use the ridiculously large bag that I bought. I have been wanting to use my ice cream maker for a sorbet. So it seemed like a match made in heaven when I saw a recipe for Cherry Sorbet pop up on Gina's Skinny Recipes. This super simple recipe helped me take the plunge into sorbet making.

    The only thing that took forever was pitting all the cherries with a pairing knife. I know, I know. They have tools for that. But I don't. Plus it actually helped take my mind off a nagging headache that I had had all weekend. So I honestly didn't mind the repetitive action.

    Cherry Sorbet

    Ingredients 
    • 2 lbs cherries
    • 1 cup water
    • 2/3 cup sugar or agave
    • 1 tsp fresh lemon juice
    Stem the cherries and remove the pits.  In a medium saucepan over medium heat, combine the cherries with the water, sugar, and lemon juice, and cook until the cherries are very soft and cooked through, about 10-15 minutes.  Remove from heat and let it cool to room temperature, then refrigerate to chill thoroughly.
    Puree the cherries and their liquid and put the mixture through a fine sieve.
    Once the cherry mixture is chilled, freeze according to your ice cream maker's instructions.


    It was so flavorful and had an surprising texture. If you don't like cherries this is not the recipe for you. But it wouldn't be too hard to substitute in another fruit.

    Be sure to keep the remaining cherry puree. You paid for it, use it! I did! I found a recipe for a quick cherry cobbler. I made that a few days later and it received as good of reviews as the sorbet.

    So take the plunge into sorbet. Its an easy, healthy and sweet treat.

    Sunday, July 31

    Magic Stromboli

    This recipe came to me via a reader/friend, Kelly. It was so simple she posted the whole recipe on my Facebook page! In her instruction she said "roll up and MAGIC stromboli!" So I just knew the dish had to be called Magic Stromboli.

    Its a great Be Your Own Chef recipe. I'll put the ingredients that I used as inspiration.

    Magic Stromboli

    4 crescent rolls (roll of 8 for 2 people)
    Cooking spray - olive oil or butter


    Pizza Toppings:
    3 Pepperonis per roll
    1 tablespoon Mozzarella per roll
    Sliced onions
    Marinated artichokes
    Parmesan cheese to top

    Pizza Sauce:
    1/2 c. Tomato paste
    1 teaspoon garlic powder
    1 teaspoon dried basil
    1 teaspoon dried oregano


    Preheat oven to 375 degrees. Lay out 4 crescent rolls with edges all pressed together on a sprayed baking sheet. Fill with your favorite toppings. Be careful to not overfill. Roll up and magic stromboli! Spray with cooking spray and sprinkle on Parmesan cheese. Bake for 11 minutes. Serve with a salad.


    They were flaky and tasty. Be sure to make a salad or something extra to go with these. Or plan to eat all four yourself!

    I put a few slices of onion in two of them and  half a chunk of artichoke in two of them. So to distinguish the different strombolis I put a tiny piece of onion on top of the onion filled ones. Clever, right?

    This would also make an excellent appetizer for your next gathering. And you can make lots of different kinds very easily. So easy to please everyone!

    Go ahead and give this simple recipe a try. Thanks to Kelly for sharing her Magic Stromboli!

    Sunday, July 24

    Orange Creamsicle Cookies

    Another great recipe from Our Forking Blog. When I first read the title of this recipe I thought to myself, "Hmm this looks too tasty to be easy enough for me to make." But since Paul and I had just had an amazing orange creamsicle bar from a bakery in downtown Charleston, I had to at least look at the recipe. To my great and joyful surprise it looked like something even I could make with my limited baking skills.


    2 1/2 cups all purpose flour
    3/4 teaspoon baking soda
    1/2 teaspoon salt
    1 cup (2 sticks) butter, softened
    1/2 cup sugar
    1/2 firmly packed brown sugar
    1 large egg
    1 teaspoon vanilla extract
    2 tablespoons orange zest (for me that was the zest of 2 oranges)
    2 cups Guitard Choc-Au-Lait Vanilla Chips (I used white chocolate chips)

    Preheat oven to 375 degrees.
    In a small bowl, combine flour, baking soda, and salt; set aside.

    In a large bowl, cream butter and sugars until light and creamy. Beat in egg and vanilla until smooth. Gradually add flour mixture until combined. Stir in orange zest and chips.
    Drop rounded teaspoonfuls onto ungreased cookie sheets. Do not flatten cookies; it will make them dry. Bake 8 - 10 minutes or until golden brown around edges. Do not overcook! Cookies will be plump. Cool for several minutes on cookie sheets before transferring to rack to cool completely. Store in airtight container.
     

    I actually made them as a surprise for Paul as a welcome home from his business trip this week. I also shared them with some friends. They got rave reviews all around.


    I couldn't believe how that little bit of orange zest perfumed the cookies. Every time I open the container of cookies I get a whiff of the lovely scent of oranges.

    If you are tired of the old stand by cookies, give this recipe a try. Impress your family and friends with this seemingly complicated cookie. They will be I'm sure of it.
     

    Wednesday, July 20

    Collard Green Pesto

    This recipe is just for fun. I have seen many variations to a basic pesto (basil, pine nuts, Parmesan, garlic, and olive oil). This recipe is boasted to be a "healthier" version. I don't know if you are cutting any calories but you are adding a ton of nutrients with the greens. Its also a good alternative for those that aren't big basil fans.

    Collard Green Pesto

    Ingredients


    • 1 pound bunch collards, ribs discarded, leaves roughly chopped
    • 1 (13-ounce) box whole-wheat linguine
    • 1/4 cup pecans
    • 1 1/4 cups grated Parmesan, plus extra for garnish
    • 1/2 cup pitted kalamata olives
    • 2 cloves garlic
    • 1 cup extra-virgin olive oil
    • Kosher salt and freshly ground black pepper

    Directions


    Bring a large pot of salted water to a boil over medium heat. Blanch collards until bright green, about 1 minute. Transfer immediately to an ice bath to shock, saving the boiling water for cooking the pasta. Remove the collards from the ice water and pat dry with paper towels before transferring them to a food processor.

    Add the linguine to the pot of salted boiling water and cook according to package instructions.

    Meanwhile, in a dry skillet, over low heat, toast the pecans until fragrant. Transfer to the food processor with Parmesan, olives and garlic. With food processor running, slowly drizzle in olive oil until pesto comes together. Taste for seasoning, and add salt and freshly ground black pepper, to taste.

    To serve, put enough pesto to coat the pasta into a large serving bowl. Drain the pasta and quickly add it to the bowl. The water still clinging to the pasta will loosen up the pesto. Toss to coat. Add more pesto, if needed. Transfer the pasta to a serving bowl and garnish with Parmesan sprinkled over the top.


    The minuses to this recipe is you have to be careful with the ingredients and really taste test as you combine them. Too much garlic or olives will really twinge the taste of the pesto. 

    Another pitfall is this recipe makes a TON of pesto. It would probably cover 2 pounds of pasta. I get really bored of eating it before its all gone. I thought of making it for the next pot luck I go to.

    Just have fun with this one. Its an interesting twist to a classic that I wanted to share.

    Tuesday, July 19

    Summer Squash Patties

    For those of you that have a backyard garden, you may have tried growing yellow squash. If so you know they go crazy in the summer months. Then you struggle for weeks trying to figure out what to do with them. Well here is one solution that I grew up enjoying.

    These savory little cakes are a great side dish for dinner or even a different take on a pancake for breakfast. It a pretty good substitute a butter and syrup covered pancake.

    Ingredients:
    • 2 cups cooked shredded squash (from 3 1/2 yellow squash)
    • 1 egg
    • 1 egg white
    • 2/3 cup flour
    • 1/2 tsp baking powder
    • 1 clove garlic, chopped
    • 1/3 cup parmesan cheese
    • 3 tbsp fresh chopped chives
    • 1/2 tsp kosher salt
    • pinch fresh cracked pepper
    • olive oil spray

    Directions:

    Add
    squash to a medium pot and cover with water. Bring to a boil and cover; cook until soft. When soft, drain; add to food processor and pulse a few times until chopped. Add 2 cups of squash to a medium bowl. Combine squash with remaining ingredients except oil and mix well.
    Heat a large skillet on medium heat, when hot spray lightly with oil and reduce heat to medium-low. Drop 1/4 cupfuls of batter, slightly flattening them with the back of a spoon and cook a few minutes or until golden. Turn and cook the other side until golden. Set aside and repeat with the remaining batter.


    The only modification I made to this recipe was I used two whole eggs and used a little butter and a non stick pan, not oil olive spray. I might try adding some cayenne for a kick.
    I like serving it with ketchup and hot sauce.

    Give it a try. These are some tasty cakes.