Showing posts with label Desserts. Show all posts

Friday, March 14

Apple Danish Ring

From time to time we have company visit us and I feel inspired to make a special breakfast/brunch type meal. My in-laws were in town a few weeks ago and I knew that I wanted to find a really special treat to add to my brunch menus. While browsing Pinterest the week before they came and saw a recipe for a delicious Apple Cream Cheese Danish. I couldn't wait to try out this recipe on my in-laws. I had a feeling this would be right up their alley.


INGREDIENTS

  • 2 (8-oz) packages crescent rolls
  • 1 (8-oz) package light cream cheese, softened
  • 1 can apple pie filling
  • ¼ cup powdered sugar
  • 1 egg yolk
  • ½ tsp. vanilla extract
  • ½ cup powdered sugar
  • 2-3 tsp. milk
INSTRUCTIONS
  1. Preheat oven to 350ยบ. Spray a pizza pan with cooking spray. Open both packages of crescent rolls and separate into 16 triangles. Arrange 12 triangles in a circle on the pizza pan, with wide edges on the outside of the pan and the points of the crescent triangles in the middle. Press the outer seams together, leaving the points in the middle alone.
  2. Make cream cheese filling: In a bowl, combine cream cheese, ¼ cup powdered sugar, egg yolk, and vanilla extract. Whisk until smooth. Spread cream cheese mixture evenly over the outer edges (about 2″ wide) of the dough, within about ½” of the edge. Spoon pie filling on top of the cream cheese layer.
  3. Now take the points of the crescent triangles in the middle of the pizza pan and place them up over the filling, pressing the point into the outer edge. Make your way around the pan doing this, making a circle shape.
  4. Cut the remaining 4 crescent triangles lengthwise into three strips. You will have 12 small triangle shaped pieces. Going around your circle, place the outer edges of the small triangles into the uncovered filling areas. There should be 12 “empty” spots to place your small triangles. Press the larger seams together on the outside of the ring and the points on the inside of the ring.
  5. Bake for 25-30 minutes, or until golden brown. Remove from oven and cool for about 10-15 minutes.
  6. Make glaze: combine ½ cup powdered sugar and 2-3 tsp. milk and mix until smooth. Drizzle evenly over pastry. Slice into triangles and serve.


I added this to the a buffet of fruit and some link sausages which I know is a family breakfast tradition. Voila! I sliced the apple ring into yummy wedges and they were devoured.

I have information from my mother in law that my father in law liked it so much that he requested for her to make it at their home. She even tried it with cherry pie filling, which is his favorite fruit. It was also a hit.

I loved this recipe because it was easy and quick. Two things I think that are really important when making brunch. You don't want to wait forever for the host to be cooking and baking forever! By brunch everyone is trying to politely act like its okay whenever the food is ready. But in reality everyone is starving!

I also enjoyed making this because it required just a few common and easy to obtain ingredients. And as my mother in law did you can easily make it your own and mix up the fillings.

So why not try this out on your next family get together or add mimosas and get a few friends together on a Sunday morning.

Monday, May 14

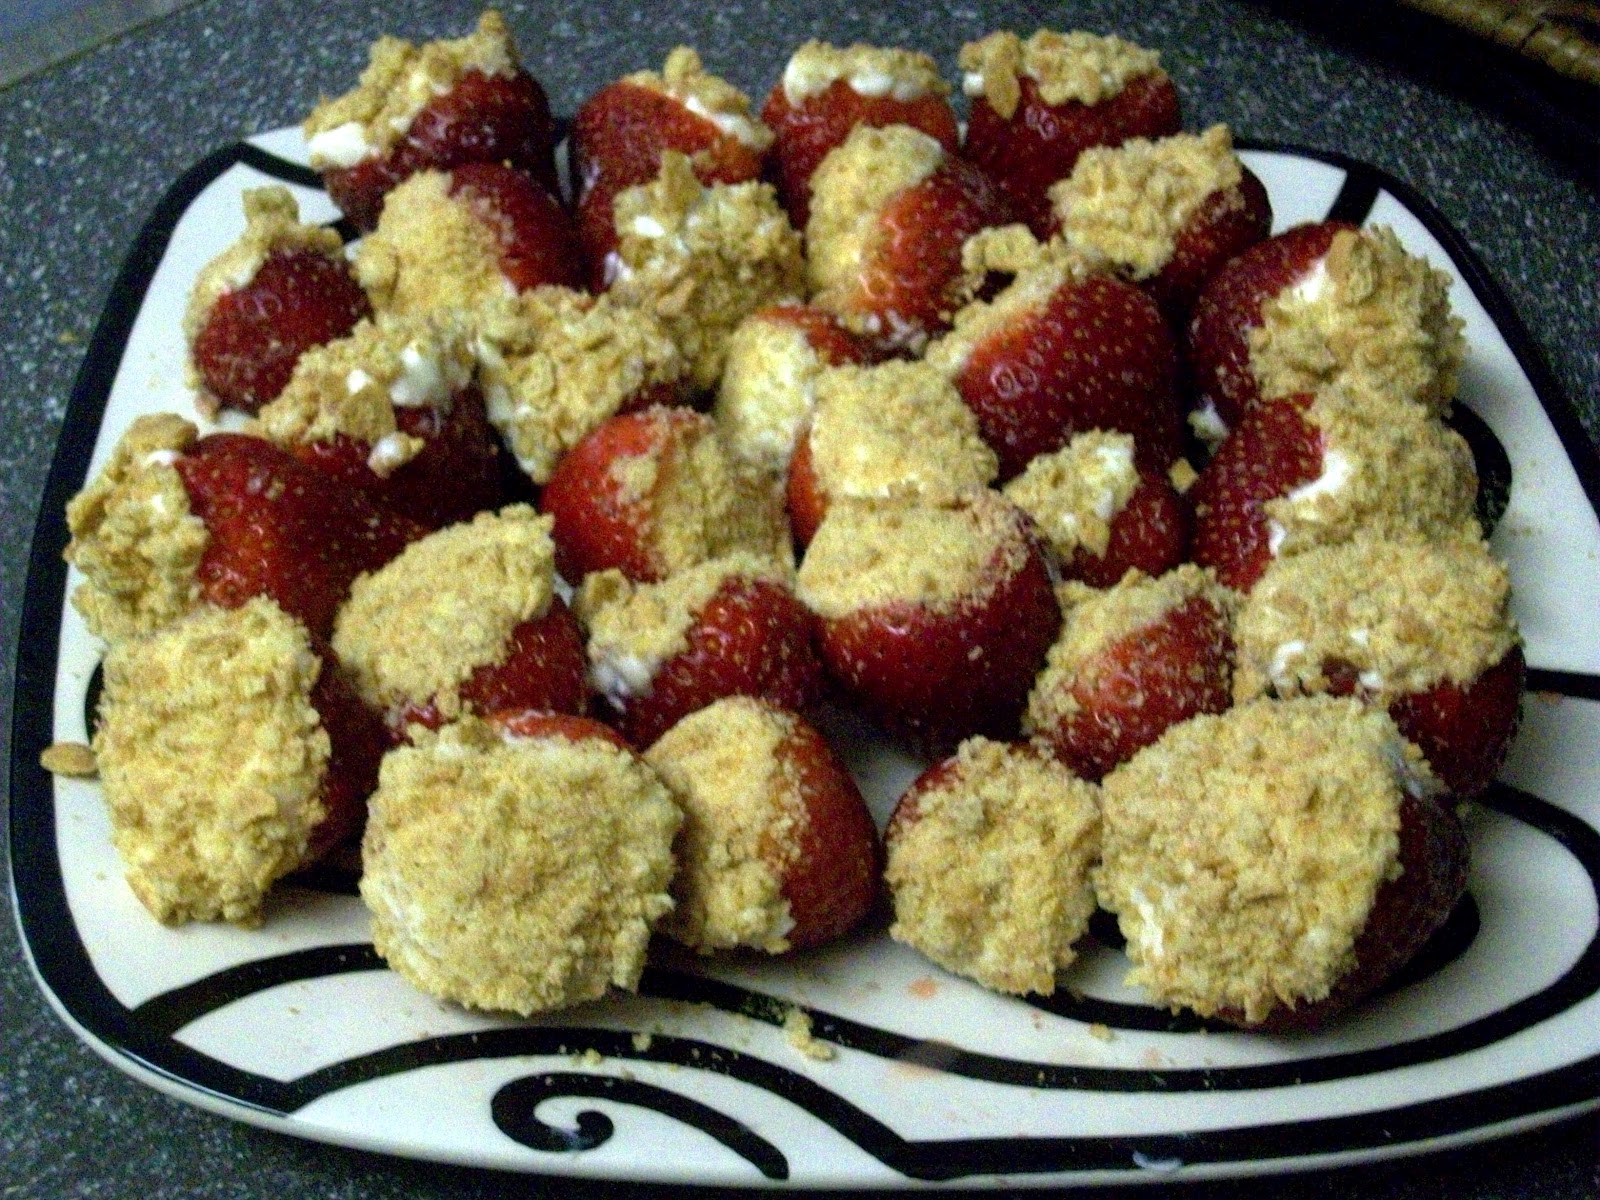
Strawberry Cheesecake Bites

All right I know that pinterest is old news by now. But as I sit here and obsessively pin things I realized that I had several new recipes to post. I figured even though I have been busy/lazy with my blog its never too late to post. I wanted to get the ball back rolling with an idea I found on pinterest.

I saw these before Paul's birthday and I just knew this had to be the first thing I tried from pinterest. With strawberries coming into season in the lowcountry and Paul loving cheesecake.

Strawberry Cheesecake Bites
by SugarDeby via pinterest

1 carton of strawberries
8 oz pkg softened cream cheese
1/2 cup powdered sugar
1/2 tsp vanilla
1 sleeve of graham crackers, crushed

Wash, cut off the top of the strawberries and then core them out. Be sure to take out enough of the core to get a healthy amount of the cheesey filling inside.
For the filling: Beat the cream cheese. Add powdered sugar and vanilla. Beat until smooth.
Fill the strawberries: Use a piping bag or a zippy bag with a corner cut off. Pipe them nice and full and dip them in the crushed graham crackers.


Mine aren't that pretty but they were a big hit at his birthday get together. We were all stuffed full of strawberries and cheesecakey filling. They might look like small bites but between a few people it was a lot of dessert!

This pin was honestly a little laborious for me. (But I was happy to do it for Paul.)

So if you haven't checked out pinterest yet or your trying to decide if its worth signing up. Do it! They are some great ideas and its an awesome way to keep all of your ideas organized. I have a whole "board" full of ideas that I have tried, that way I don't lose the information so I can try it again and again.

Sunday, December 25

Christmas cookies - Mint cookies

Throughout the year I am not generally into cookies. I figure there are a lot of better ways to waste some calories on sweet treats then a mere cookie. Between that an my hatred for baking, fresh baked cookies don't appear too often in my home.

Thinking back this was the time of year that fresh baked cookies would make an appearance in my family home. So I thought I would continue the tradition.


We would decorate cookies every year and leave some for Santa.


With a note and milk of course. We also left a few carrot sticks for the reindeer. We knew that not everyone remembered to leave the reindeer snacks.

Decorating cookies isn't really what I wanted to post about though. I just wanted to share a few nostalgic photos.

What I really wanted to share is a few recipes that I think of as Christmas cookies. The first is one from my mom's recipe book. I tried to make these myself this year and had a huge fail! They still tasted okay but there was too much butter and the cookies spread out waaaay too much. (maybe next year...) The other recipe I found on foodnetwork.com and had great success with. This recipe is going in my recipe book. They are both excellent recipes. Just like with any other baked good remember to not be lazy like me and measure carefully. Ha.

Melt-Away Peppermint Wreaths

1-1/4 c. butter, softened
3/4 c. sifted powdered sugar
2-1/2 c. all purpose flour
3/4 teaspoon peppermint extract
red and green food coloring

Cream butter, gradually add sugar beating well.
Add flour and mix well. Stir in peppermint extract. Divide dough in half and place in separate bowls. Tint half with the red food coloring and the other half with the green.
Roll dough into balls using 1/2 teaspoon dough per ball. For each wreath-shaped cookie, place 6 balls in a circle on ungreased cookie sheets, alternating colors. Press together securely. Bake at 375 degrees for 8 minutes.
Let cool for 10 minutes; remove to cooling racks and cool completely.


I divided the one of the dough balls in half again and left it white to also make candy cane shapes. This picture was taken before they went in the oven. Sadly I wasn't able to take a good shot of them after they came out. Actually looking at the picture I may or may not have made the balls too big as well. Oops.
These cookies are true to their name, they will melt in your mouth. A sweet buttery taste with the sharp tang of peppermint give these cookies a Christmas-y feel. The cute shapes only reinforce the holiday theme. They are a definitely classic in my book.

Delicate Mint Sandwich Cookies
by Melissa d'Arabian

Cookies:

1/2 cup unsalted butter, softened
2 ounces cream cheese, softened
3 tablespoons granulated sugar
1 1/4 cup all-purpose flour

Mint Filling:

1/2 cup confectioners' sugar
2 tablespoons butter, softened
1 or 2 drops mint extract
1 or 2 drops red or green food coloring

Confectioners' sugar, for dusting, optional

For the cookies: Preheat the oven to 375 degrees F. Cream the butter, cream cheese and sugar until smooth using a handheld mixer in a medium bowl. Add the flour slowly, mixing on low, until incorporated. Scoop the dough into a ball using your hands and cover with plastic wrap. Refrigerate until the dough has firmed slightly, about 30 minutes.
On a floured surface, roll the dough about 1/8-inch thick. Cut out as many rounds as possible with a small cookie cutter and transfer to ungreased baking sheets, leaving about 1 inch between each cookie. Re-roll the dough scraps and repeat until all the dough is used. Use a smaller cutter, about 3/4-inch, or cut freehand with a small sharp knife to punch a small window out of half of the cookies. Place the cutouts on the baking sheets.
Bake until golden around the edges, 12 to 15 minutes. Cool for 5 minutes on the baking sheets and then transfer to wire racks to cool completely.
For the filling: Place the sugar, butter, mint extract, food coloring and 1/2 teaspoon of water in a medium bowl and beat on medium speed until well combined and fluffy. Spread a thin layer of mint filling on the cookies without the windows and place the wafers with the windows on top. Sprinkle with the confectioners' sugar, if using, and serve the sandwich cookies with the cutout cookies on the side.


 A friend of mine has a picture of the ones I made. I used a star shaped cookie cutter and I did not do the cut out part. I also doubled the recipe for the frosting. When I made it looked like a few tablespoons of frosting. Haha. I knew that wasn't enough.
I, my friends, Paul and my parents loved these cookies. They are as titled delicate cookies. Not too sweet of a cookie which pairs well with the sugary frosting. Even though they are pretty labor intensive, I would like to make these again soon. Because they were really that good. But I am glad I was making them with my friend so that we could chat and cut up while making them.

Even if baking is not your thing, Christmas is a great time to flex those muscles. You can give them as gifts to those hard to buy for coworkers or take them to a church cookie walk or just enjoy them for yourself with a tall cold glass of egg nog.

Oh and Merry Christmas!

Tuesday, November 1

Lollipop Ghosts

Okay I know I should have posted this beFORE Halloween but I didn't...

This is just a cute quick craft to spruce up your candy assortment. This is something kids can help with, or like me just do because you have an extra 15 minutes the afternoon of Halloween.
I decided to take step by step photos, even though it was honestly unnecessary.\

Lollipop Ghosts

Supplies:
  • Lollipops (Toostie Pops)
  • Ribbon, gift wrapping ribbon, or just tape (I used white gift wrapping ribbon)
  • Tissues
  • Sharpie or black marker
  • Scissors

  • Cut ribbon into equal lengths. Like I say at work all the time "Batch your tasks. Doing the same thing over and over will make you move faster." (I really do say this at work almost everyday.)

  •  I folded my tissues once corner to corner to make a triangle.

  • Twist the tissue over the top of the lollipop and knot a piece of your ribbon underneath the pop.
  •  Draw on a spooky face!

  •  BOO! Add them to your candy bowl. 
    The few kids that came to our place seemed to like the cute ghosties. I was pleased with the results.

    If I had thought ahead, I could/should have made these to take to work. They could even be a cute decoration for a Spooky party.

    They are cute, fun and easy. Get the candy and you'll probably already have the rest of the supplies. Those are my favorite crafts.

    Hope everyone had a happy and safe Halloween.

    Monday, August 1

    Fresh Cherry Cobbler

    When I made Cherry Sorbet a few weeks ago, I spent a long time pitting over 3 pounds of fresh cherries. I just couldn't dump the leftover puree in the trash. I saved it in a plastic container in the fridge for a few days till I could find another purpose for it. I was so excited to come across a recipe for fresh cherry cobbler on All Recipes.


    Ingredients
    • 1/2 cup butter
    • 1 cup all-purpose flour
    • 1 cup white sugar
    • 1 teaspoon baking powder
    • 1 cup milk
    • 2 cups pitted sour cherries (sub in the cherry puree)
    • 3/4 cup white sugar
    • 1 tablespoon all-purpose flour
    Preheat the oven to 350 degrees F. Place the butter in a 9x13 inch baking dish, and place in the oven to melt while the oven is preheating. Remove as soon as butter has melted, about 5 minutes.
    In a medium bowl, stir together 1 cup of flour, 1 cup of sugar, and baking powder. Mix in the milk until well blended, then pour the batter into the pan over the butter. Do not stir.
    Rinse out the bowl from the batter, and dry. Place cherries into the bowl, and toss with the remaining 3/4 cup of sugar and 1 tablespoon of flour. Distribute the cherry mixture evenly over the batter. Do not stir.
    Bake for 50 to 60 minutes in the preheated oven, until golden brown. A toothpick inserted into the cobber should come out clean. 
    I undercooked the crust a little bit. It was very buttery and very tasty. It was a great use for the leftover cherry puree. Although keep in mind that the cherry puree had a lot of the natural flavor zapped out of it, from the cherry sorbet. So that made this dessert not as cherry to the extreme in flavor.
     I served it hot with vanilla ice cream. I think it went over pretty well with everyone.
     So don't waste that leftover cherry puree. Or if you are so inclined you could just make this recipe.  
    I won't judge.

    Cherry Sorbet

    Cherries were on sale at the grocery store a few weeks ago, I just had to find a reason to use the ridiculously large bag that I bought. I have been wanting to use my ice cream maker for a sorbet. So it seemed like a match made in heaven when I saw a recipe for Cherry Sorbet pop up on Gina's Skinny Recipes. This super simple recipe helped me take the plunge into sorbet making.

    The only thing that took forever was pitting all the cherries with a pairing knife. I know, I know. They have tools for that. But I don't. Plus it actually helped take my mind off a nagging headache that I had had all weekend. So I honestly didn't mind the repetitive action.

    Cherry Sorbet

    Ingredients 
    • 2 lbs cherries
    • 1 cup water
    • 2/3 cup sugar or agave
    • 1 tsp fresh lemon juice
    Stem the cherries and remove the pits.  In a medium saucepan over medium heat, combine the cherries with the water, sugar, and lemon juice, and cook until the cherries are very soft and cooked through, about 10-15 minutes.  Remove from heat and let it cool to room temperature, then refrigerate to chill thoroughly.
    Puree the cherries and their liquid and put the mixture through a fine sieve.
    Once the cherry mixture is chilled, freeze according to your ice cream maker's instructions.


    It was so flavorful and had an surprising texture. If you don't like cherries this is not the recipe for you. But it wouldn't be too hard to substitute in another fruit.

    Be sure to keep the remaining cherry puree. You paid for it, use it! I did! I found a recipe for a quick cherry cobbler. I made that a few days later and it received as good of reviews as the sorbet.

    So take the plunge into sorbet. Its an easy, healthy and sweet treat.

    Sunday, July 24

    Orange Creamsicle Cookies

    Another great recipe from Our Forking Blog. When I first read the title of this recipe I thought to myself, "Hmm this looks too tasty to be easy enough for me to make." But since Paul and I had just had an amazing orange creamsicle bar from a bakery in downtown Charleston, I had to at least look at the recipe. To my great and joyful surprise it looked like something even I could make with my limited baking skills.


    2 1/2 cups all purpose flour
    3/4 teaspoon baking soda
    1/2 teaspoon salt
    1 cup (2 sticks) butter, softened
    1/2 cup sugar
    1/2 firmly packed brown sugar
    1 large egg
    1 teaspoon vanilla extract
    2 tablespoons orange zest (for me that was the zest of 2 oranges)
    2 cups Guitard Choc-Au-Lait Vanilla Chips (I used white chocolate chips)

    Preheat oven to 375 degrees.
    In a small bowl, combine flour, baking soda, and salt; set aside.

    In a large bowl, cream butter and sugars until light and creamy. Beat in egg and vanilla until smooth. Gradually add flour mixture until combined. Stir in orange zest and chips.
    Drop rounded teaspoonfuls onto ungreased cookie sheets. Do not flatten cookies; it will make them dry. Bake 8 - 10 minutes or until golden brown around edges. Do not overcook! Cookies will be plump. Cool for several minutes on cookie sheets before transferring to rack to cool completely. Store in airtight container.
     

    I actually made them as a surprise for Paul as a welcome home from his business trip this week. I also shared them with some friends. They got rave reviews all around.


    I couldn't believe how that little bit of orange zest perfumed the cookies. Every time I open the container of cookies I get a whiff of the lovely scent of oranges.

    If you are tired of the old stand by cookies, give this recipe a try. Impress your family and friends with this seemingly complicated cookie. They will be I'm sure of it.
     

    Thursday, July 7

    Pink Lemonade Cake

    I made a version of this cake as a thank you gift for Paul. I wanted to do something special for him after he helped my parents paint their new house. When I say a version I mean I used the basic idea and added my own flavor and didn't pay any attention to the recipe. This was not a good plan. That's why I'm going to give you the exact recipe from Paula Deen that I modeled my cake after and recommend that you make it her way. Not mine.

    Pink Lemonade Cake

    Ingredients 

    Cake:
    1 cup (2 sticks) unsalted butter, softened, plus more, for coating pans
    1 (18 1/4-ounce) box white cake mix
    1 teaspoon finely grated lemon zest
    2 teaspoons vanilla extract
    3 tablespoons sweetened pink lemonade drink powder
    Icing:
    1 pound confectioners' sugar
    5 tablespoons frozen pink lemonade concentrate
    1 teaspoon vanilla
    1 teaspoon finely grated lemon zest


    Preheat the oven to 350 degrees F. Butter 2 (8-inch) round cake pans and line the bottoms with parchment paper or waxed paper.

    Prepare the cake batter according to the package directions. To the batter, stir in the lemon zest, vanilla, and pink lemonade powder. Pour the batter evenly into the prepared pans. Bake until golden and a toothpick inserted into the center of the cake comes out clean, 30 to 35 minutes. Let the cakes cool in the pans for 10 minutes. Carefully turn the cakes out onto a wire rack to cool completely.

    While the cake is baking, prepare the frosting by beating together the confectioners' sugar and remaining 1 cup butter until fluffy. Beat in the remaining frosting ingredients until combined.

    Transfer one cake to a cake stand or large platter. Using an offset spatula, spread the top of the cake with a layer of frosting. Place the second cake on top of the first. Spread the remaining frosting over the top and sides of both layers.


    I used a strawberry lemonade mix and decorated it with fresh cut strawberries. Since I didn't pay close enough attention to the ingredients I put in too much of the lemonade mix and it came out too tart.


    Although it was edible and it turned out very pretty. So that was worth something, right?

    Paul appreciated that I went out of my comfort zone and actually baked something for him. It is true what they say, "The way to a man's heart is through his stomach". I believe this to be true for women too, maybe I should speak for myself.

    I like this idea for a thank you present, plus if you're lucky the person you give it to will share.

    Monday, July 4

    4th of July Parade & Flag Cake

    When I was kid before the age of ten years old, I lived in Elkhart, Indiana. It was a very typical midwestern town. It was a safe, calm and great place to be a kid. We lived in a neighborhood with a ton of school age kids. We were able to run and bike around in the streets. (I feel like that is pretty uncommon now-a-days.) I feel very lucky that I was able to be to be part of a community like this.

    We would shoot off fireworks, have cookouts, light sparklers, and would have 4th of July parades.
    Parade? I'm not talking about the big downtown parades with giant floats. I mean a parade of neighborhood kids with their ridiculously decorated bikes! We used all kinds of patriotic decorations and then we'd roll down the streets with our parents by our sides.


    Now that I'm older its easy to see that all the loud and dangerous fireworks, adult beverages, hot grills, and staying up past dark to see the fireworks, made Independence Day not especially kid friendly. Well except the hamburgers and hot dogs. So its great that our parents found a way to include us in the celebration.


    Just don't do it around naptime. You might have some tears.

    I love this idea because you can even get the littlest babies involved. Just dress them up and put them in the wagon.


    In this post, just for the holiday, I am giving you a bonus idea!
    Another fun 4th idea is a flag cake!


    Just make any kind of sheet cake you want: red velvet, yellow, chocolate, or even funfetti! Use white frosting, strawberry halves, and blueberries. Easy-peasy and patriotic.

    Just be sure to be safe, have fun and be patriotic!

    Monday, June 27

    Deep Fried Oreos - Guest Post

    Hi there, Danielle has been working super hard this week on top of putting together a few new crafts so I volunteered to write up a guest post for her blog (I am such a super wonderful husband like that!). I do have a blog of my own, but I must admit that it is seldom interesting or updated.

    One of my all time favorite activities is to go to the fair. Nothing beats spending a warm October day outside with friends and family indulging in some sensory overload. Growing up my family and I would frequent the North Carolina State Fair, and Danielle and I have, if you will excuse the pun, fairly recently started going to the Carolina Renaissance Festival together. No matter the type of fair, one of the highlights is always the food! Funnel Cakes, BBQ, Turkey Legs, Kettle Corn, Peanuts, Cotton Candy and the deep fried food of the year.

    One thing I have learned going to fairs is that almost anything can be deep fried. Twinkies, Snickers, Coke, Butter, Cheeseburgers and even beer! One of my first deep fried fair food memories is the ever amazing deep fried oreo! This snack is so amazing I figured, why wait to indulge but just once a year, and set out to recreate it!

    What is in here? Who knows, it could be anything!


    Ingredients:
    1 Package of Oreo Cookies
    1 Cup of Pancake Mix
    1 Large Egg
    1 Cup of Milk (or water)
    2 Teaspoons of Vegetable Oil
    Peanut Oil (Depending on your frying apparatus)

    Instructions:

    -Heat up the peanut oil in your deep frying apparatus to about 375 degrees Fahrenheit. And no, you do not need to have a special deep fryer. You can just as easily use a deep skillet, you ideally need about 3-4 inches of oil in the skillet at minimum if you don't have a deep fryer.

    -Add the Pancake Mix, Egg, Milk and Vegetable Oil in a medium mixing bowl and whisk until smooth.

    -Dip the cookies into the batter, covering the cookie as much as possible and then carefully place into the oil. Continue until you have a batch of about 6 cookies frying at a time. You may need to adjust up or down depending on the size of your frying apparatus.


    -Each batch should fry for 1 minute on each side until the batter turns golder brown. Remove the cookies from the fryer and let them drain on a paper towel.

    -When you ready to serve, sprinkle some powdered sugar over the top of the cookies! And indulge!

    One thing to keep in mind is that deep fried oreos do not make good leftovers, so plan ahead for how many you want to make, instead of making the whole bag (unless that is your plan).

    They might not be pretty, but they are pretty dang good!


    If you want to double your fun (and I don't mean by using double stuffs!) you could use this snack to help make a fun indoor fair day on a rainy day. Just add a few fun 'fair' games of skill/chance, some blue ribbon art contests and learning about the local livestock!

    Wednesday, May 4

    Cake Pop Fail

    So not every one of my posts can be a win. In fact I can't believe I went this long without having a failure. Although I had such high hopes for these cake pops. My biggest problem was getting too ambitious.

    I decided to write this post anyway even though my attempt was such a failure. I wanted to give you some tips of where I think I failed and show you some instructions of non-fail cake pops.

    First off this idea for making cake pops came from my friend Bish (Cosplay Random on Facebook). She sent me a link for some seemingly easy directions. I say seemingly because I'm sure they would actually work if you followed them better then I did.

    Little Miss Momma: Cake Pop Recipe

    My original idea was to make chili pepper shaped cake pops for a Cinco de Mayo celebration. So I started off on the right track.


    I made the devil's food cake and I even added a 1/2 teaspoon of cayenne for some kick. It was fun to essentially destroy the pretty cakes I baked.

    I added the frosting and molded the cake into a pepper like shape. Although in hind sight they were a little too big and heavy for the stick. The irregular shape made balancing on the stick impossible. I let them chill in the fridge while I heated up the chocolate.

    This is where my major fail occurred while heating the candy coating. I heated per instructions on the bag, but I missed the part in the internet instruction where it told me to add the shortening to thin out the candy. So I continued to heat it thinking it would thin out. Uh, no. Then I read on the bag that overheating would cause it to seize up. AHHH! Noooo... I tried to add vegetable oil as the bag instructions advised, but icing the cake pops ended up being impossible.

    Then they turned into cake blobs... So I iced the blobs with the candy coating.


    And they would have been so cute. I also had trouble getting a good dark red. If I were to do it again I would get the red candy to begin with.

    I ate one of the peppers that stayed on the stick without the candy coating just because.


    So I failed. Oh well. Maybe the next time I can learn from my mistakes and make something awesome!

    Till then I will enjoy my cake blobs.

    Friday, April 29

    Cadbury Egg Brownies

    This idea came from my bestest friend Laura. This is an excellent idea to use up that extra candy. Assuming that you have extra candy...

    I took a recipe from Food Network and modified it to her specifications.

    Deep Dish Brownies

    3 tablespoons unsalted butter
    2 tablespoons canola or other neutral tasting oil
    4 ounces semisweet chocolate, coarsely chopped
    3 Cadbury cream eggs, chopped
    3/4 cup packed dark brown sugar
    1/4 cup white sugar
    2 teaspoons pure vanilla extract
    1/2 teaspoon fine salt
    2 large eggs, cold
    1 tablespoon cold brewed coffee
    1/4 cup cocoa powder
    3/4 cup all-purpose flour
    1/4 teaspoon baking soda


    Heat oven to 325 degrees F. Use an 9x9 silicon baking pan or line a similar sized metal or glass baking dish with foil so it hangs over the edges by about 1 inch. Spray the prepared pan completely.
    Put the butter, oil and chocolate in a microwave-safe bowl, and heat at 75 percent power for 2 minutes. Stir, and microwave again until completely melted, about 2 minutes more. 
    Stir the brown and white sugars, vanilla and salt into the chocolate mixture with a wooden spoon. Add the eggs and coffee and beat vigorously until fully incorporated and the batter is thick and glossy. Add the cocoa, flour and baking soda and stir just until it disappears.
    Pour the batter into the pan and bake until the top is crispy and a toothpick inserted into the middle comes out with a few crumbs, about 30-40 minutes.
    Cool the brownies in the pan on the counter. Lift brownies out of the pan by the foil, if needed. Peel off the foil and cut into 2-inch squares.


     The brownie recipe is a healthy version of brownies. As healthy as brownies can be I suppose. They came out not too sweet, fudgey and fluffy.

    I would make these again, with or without the Cadbury eggs. 
    I think this is a clever idea to use up some candy. Or a fun excuse to make brownies.

    Enjoy! And thanks Laura to for the tasty idea.

    Thursday, April 28

    Sugar Cookies

    So to be honest I'm not a fan of sugar cookies. Especially those hard, crumbly ones covered in super sweet icing. It's not my thing. So I found a recipe that hit the spot. Alton Brown, Food Network's recipe master put together this gem.

    Sugar Cookies

    3 cups all-purpose flour
    3/4 teaspoon baking powder
    1/4 teaspoon salt
    1 cup unsalted butter, softened
    1 cup sugar
    1 egg, beaten
    1 tablespoon milk
    (1 teaspoon vanilla extract, I added this for extra flavor)
    Powdered sugar, for rolling out dough

    Sift together flour, baking powder, and salt. Set aside. Place butter and sugar in large bowl of electric stand mixer and beat until light in color. (I don't have a stand mixer, I used a hand mixer) Add egg and milk and beat to combine. Put mixer on low speed, gradually add flour, and beat until mixture pulls away from the side of the bowl. Divide the dough in half, wrap in waxed paper, and refrigerate for 2 hours.
    Preheat oven to 375 degrees F.
    Sprinkle surface where you will roll out dough with powdered sugar. Remove 1 wrapped pack of dough from refrigerator at a time, sprinkle rolling pin with powdered sugar, and roll out dough to 1/4-inch thick. Move the dough around and check underneath frequently to make sure it is not sticking. If dough has warmed during rolling, place cold cookie sheet on top for 10 minutes to chill. Cut into desired shape, place at least 1-inch apart on greased baking sheet, parchment, or silicone baking mat, and bake for 7 to 9 minutes or until cookies are just beginning to turn brown around the edges, rotating cookie sheet halfway through baking time. Let sit on baking sheet for 2 minutes after removal from oven and then move to complete cooling on wire rack. Serve as is or ice as desired. Store in airtight container for up to 1 week.


    Okay so this looks complicated. Well as far as I'm concerned it is. But that's because I do NOT bake. I do Not like to bake. Me and baking are not friends. I always forget some important part of the process. And the whole thing fails.

    So I was excited that the first time I made these I was able to not fail. I saved the second part of the dough and rolled it out a few days later and baked up some more stars. Of course they aren't perfect because I forgot to grease the cookie sheet and I tried to cram them all on one cookie sheet. But I don't mind if they look crazy, as long as they still taste good.

    A word of warning. Try not to take shortcuts. The closer you follow this the better the cookies will be. Alton Brown is very specific and scientific with his recipes. There is an important reason for every step.

    They turned out soft and melt in your mouth delicious. I suppose you could put icing on them too, but they were good enough without.

    If you like sugar cookies give it a try and this might be one of your new favorites... if you don't like sugar cookies give it a try and it might become one of your favorites.

    Saturday, April 16

    Make Your Own Ice Cream

    This is a great rainy day activity or hot, sunny day. It is fun for groups, kids or adults, parties, holidays. This was a family tradition for us to make homemade ice cream on 4th of July.

    Just remember that this idea does require some special equipment and foresight. Make sure you have a good recipe... and all the ingredients.

    Also if this is the first time you are using your machine be sure to read ALL the directions.
    Like our new machine explains you have to freeze the container for at least 8 hours. Of course we were intending to eat the ice cream sometime today... so... We decided to give it a try after freezing it a significantly shorter amount of time.

    We decided on a recipe from ice-cream-recipes.com.

    Strawberry Ice Cream

    3 egg yolks (beaten)
    1/2 pint milk
    1/2 pint heavy cream
    4 oz sugar
    2 cups of strawberries
    1 teaspoon of vanilla extract

    Take the strawberries and mash them in with half the sugar in a bowl. Place in the refrigerator while making the rest of the recipe.
    In a separate saucepan, mix the egg yolks with the milk, salt and the remaining sugar. Place over a medium heat just to boiling point (stirring all the time). DO NOT LET IT BOIL.
    Transfer the mixture into a chilled bowl to cool. When cool place in the refrigerator for up to 3 hours, remembering to stir the mixture from time to time. When cool, stir into the mixture the cream and vanilla essence and then blend in the strawberry/sugar mixture.
    Transfer the complete mixture into an ice cream maker and follow the manufacturer's instructions.

    But instead of the strawberries we added homemade cookie dough. Yum Yum.


    We did have to eat half of it before we added it to the ice cream. And we even have leftover cookie dough frozen and ready for baking at a later time.

    Paul found a egg-less cookie dough recipe, which I like to call the...

    Edible Chocolate Chip Cookie Dough

    2 cups of all purpose flour
    1/2 teaspoon salt
    3/4 cup melted butter
    1 cup light brown sugar, packed
    1 Tablespoon vanilla extract
    4 Tablespoons of milk
    1 bag of semisweet chocolate chips (we used mini chips)

    Mix all ingredients in a bowl. Add a splash water if the dough doesn't come together.
    Roll into a several logs and wrap in plastic wrap. Place in the freezer for at least one hour. Chunk up and add to ice cream during freezing process.


    You can put just about anything you want in your ice cream. Some additives might require a special recipe. We also added half of a vanilla bean for the classic specks and flavor. (And well because I had some, so why not?)

    It will be softer then your typical 'grocery store' ice cream. If you were to leave it in your freezer for several days then it would possibly get that hard. Most likely it won't last that long.


    Good luck and enjoy!

    Friday, April 15

    Chocolate Stout Cake

    I was trying to think of a fun place to start my idea station.  Then I realized where is a better place to start then a chocolate cake made with beer! Excellent idea!
    I have always pined for the Highland Stout cake at the French Broad Chocolate Lounge in Asheville, NC.  It's absolutely divine.  Every time we visit this amazing restaurant I HAVE to order this cake.  Everything on the menu is amazing (I have tasted other desserts), but I can't help myself. This cake is just too good to pass up!
    Anyway... I had been debating on how I could recreate this dessert at home. One January day I was reading the December 2010 issue of Real Simple magazine p. 266 and there it was! A Chocolate Stout Bundt Cake!
    I decided to wait till Valentine's day to bake this creation.  Also I had to modify the recipe because I don't own a bundt pan.  But that was okay, I wanted a cake.

    So this is what I came up with.  The cake recipe is a slight variation of the one from the one in Real Simple and the buttercream recipe is something I found on foodnetwork.com from Paula Deen.

    Chocolate Stout Cake with Coffee Buttercream

    Cake:
    1 cup softened unsalted butter, plus more for pans
    2-1/2 cups flour, leveled
    3/4 teaspoon baking soda
    1/2 teaspoon salt
    3/4 cup stout beer (such as Guinness)
    12 oz. semisweet chocolate, chopped or chips
    3 large eggs
    1 cup sugar
    1 cup packed dark brown sugar
    1/2 cup sour cream
    1/2 heavy cream

    -Preheat oven to 350 degrees. Butter 2 8x8 pans. Whisk together flour, baking soda, and salt.
    -In a small saucepan, combine butter and stout. Cook over medium heat, stirring, until butter is melted. remove from heat and add 8 oz. of chocolate. Whisk until smooth.
    -Use electric mixer, beat eggs and sugars on medium-high until fluffy. Beat in the chocolate mixture and sour cream. Reduce speed to love and gradually add flour mixture until just combined. (do not over mix)
    -Pour into the prepared pan and bake until a toothpick comes out with a few moist crumbs, 30-45 minutes. Let cool in pan for 30 minutes then invert onto a rack to cool completely.
    -In a small saucepan, bring the heavy cream to a boil. Remove from heat and add remaining 4 oz. of chocolate. Let sit for 5 minutes. Whisk until smooth. Drizzle on cake after icing.

    Coffee Buttercream:
    3 cups powdered sugar
    1/2 cup softened butter
    1/4 cup strong coffee, cooled

    -Mix with electric mixer the sugar and butter until smooth. Then mix in coffee.
    -Ice cake when completely cooled.
    -Do a layer of icing between the two cakes as you stack.


    I also added some crumbled up Ferrero Rocher chocolates on top and dusted it with cocoa powder. It was great.  It even got more moist throughout the week. Just be sure you have more than just your significant other to share this cake with. Its a big one and very rich!  But not too sweet.

    Enjoy!